On-device VAD + ASR (本地非流式语音识别)
This page describes how to build SherpaOnnxVadAsr for on-device non-streaming speech recognition that runs on HarmonyOS.
Hint
This page is for non-streaming models.
This page is NOT for streaming models.
Open the project with DevEco Studio
You need to first download the code:
# Assume we place it inside /Users/fangjun/open-source
# You can place it anywhere you like.

cd /Users/fangjun/open-source/

git clone https://github.com/k2-fsa/sherpa-onnx
Then start DevEco Studio and follow the screenshots below:
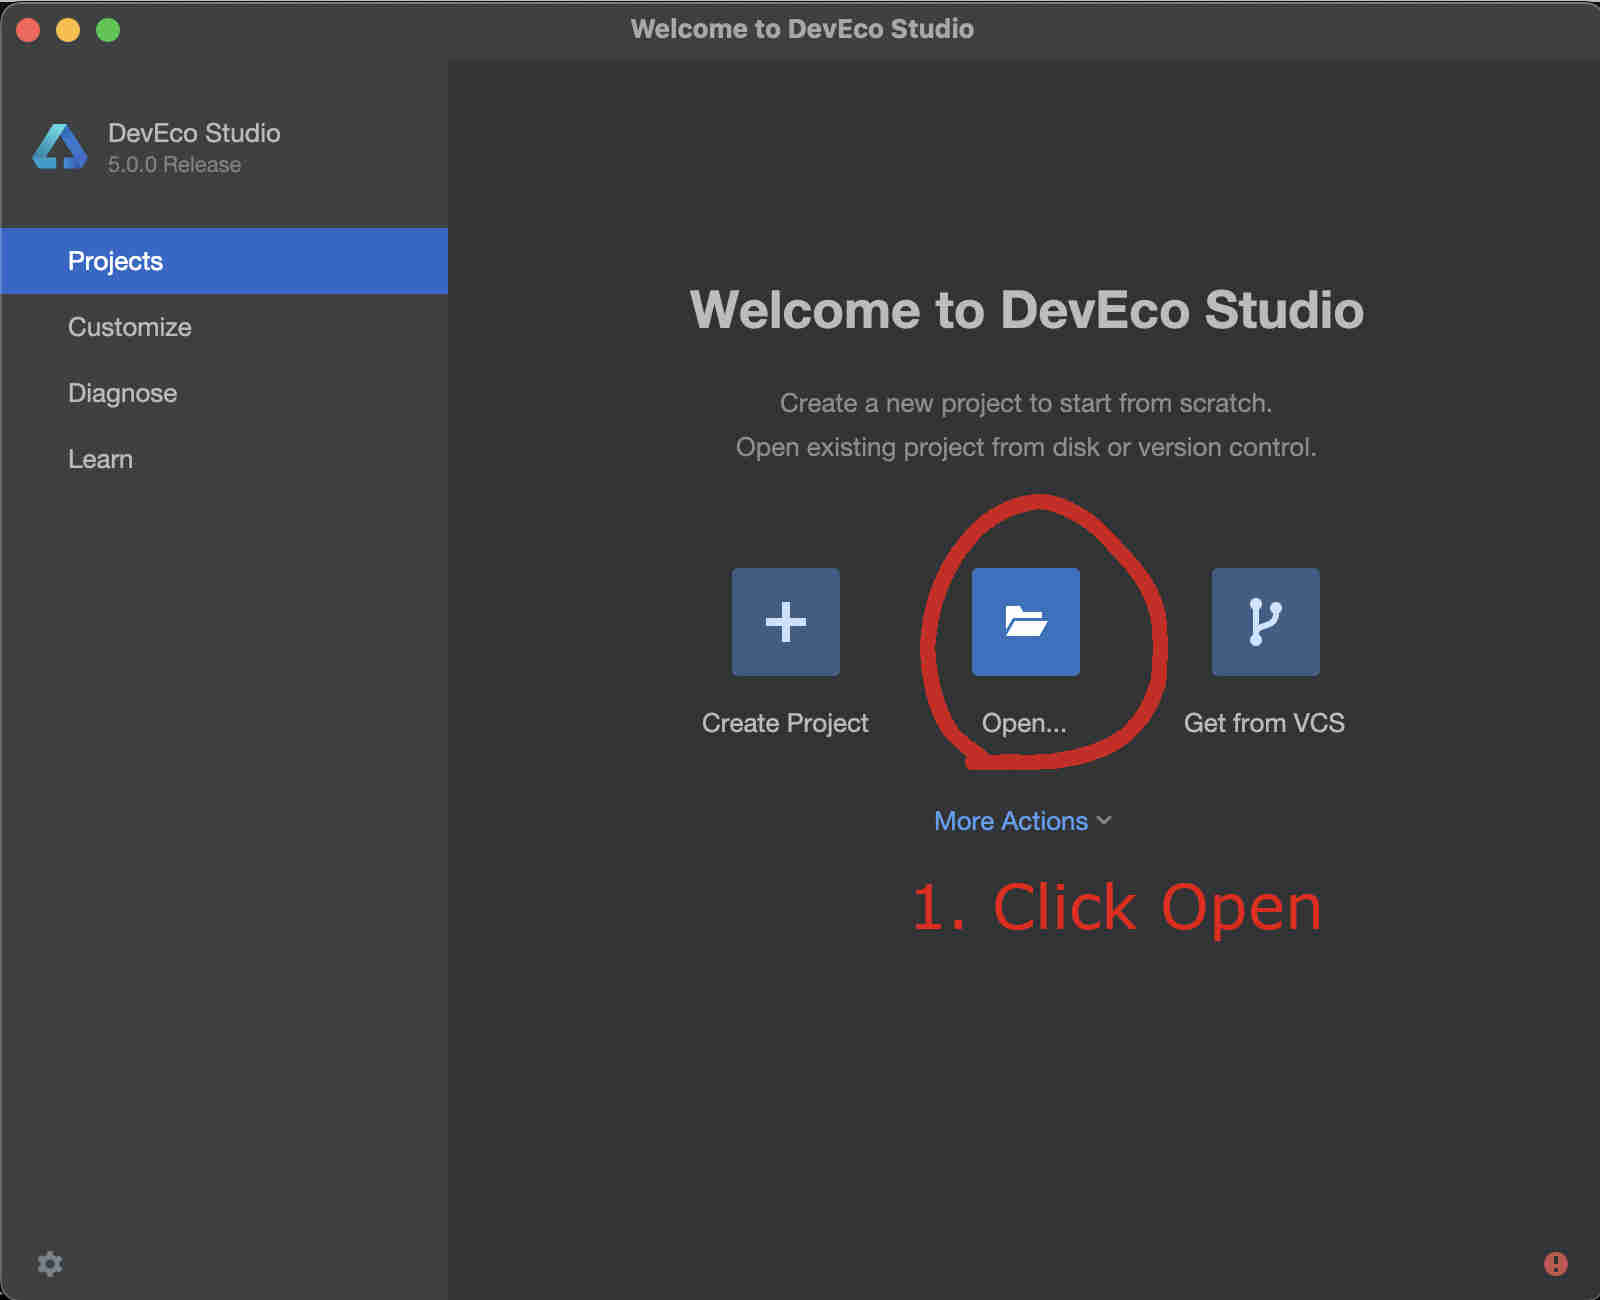
Fig. 74 Step 1: Click Open
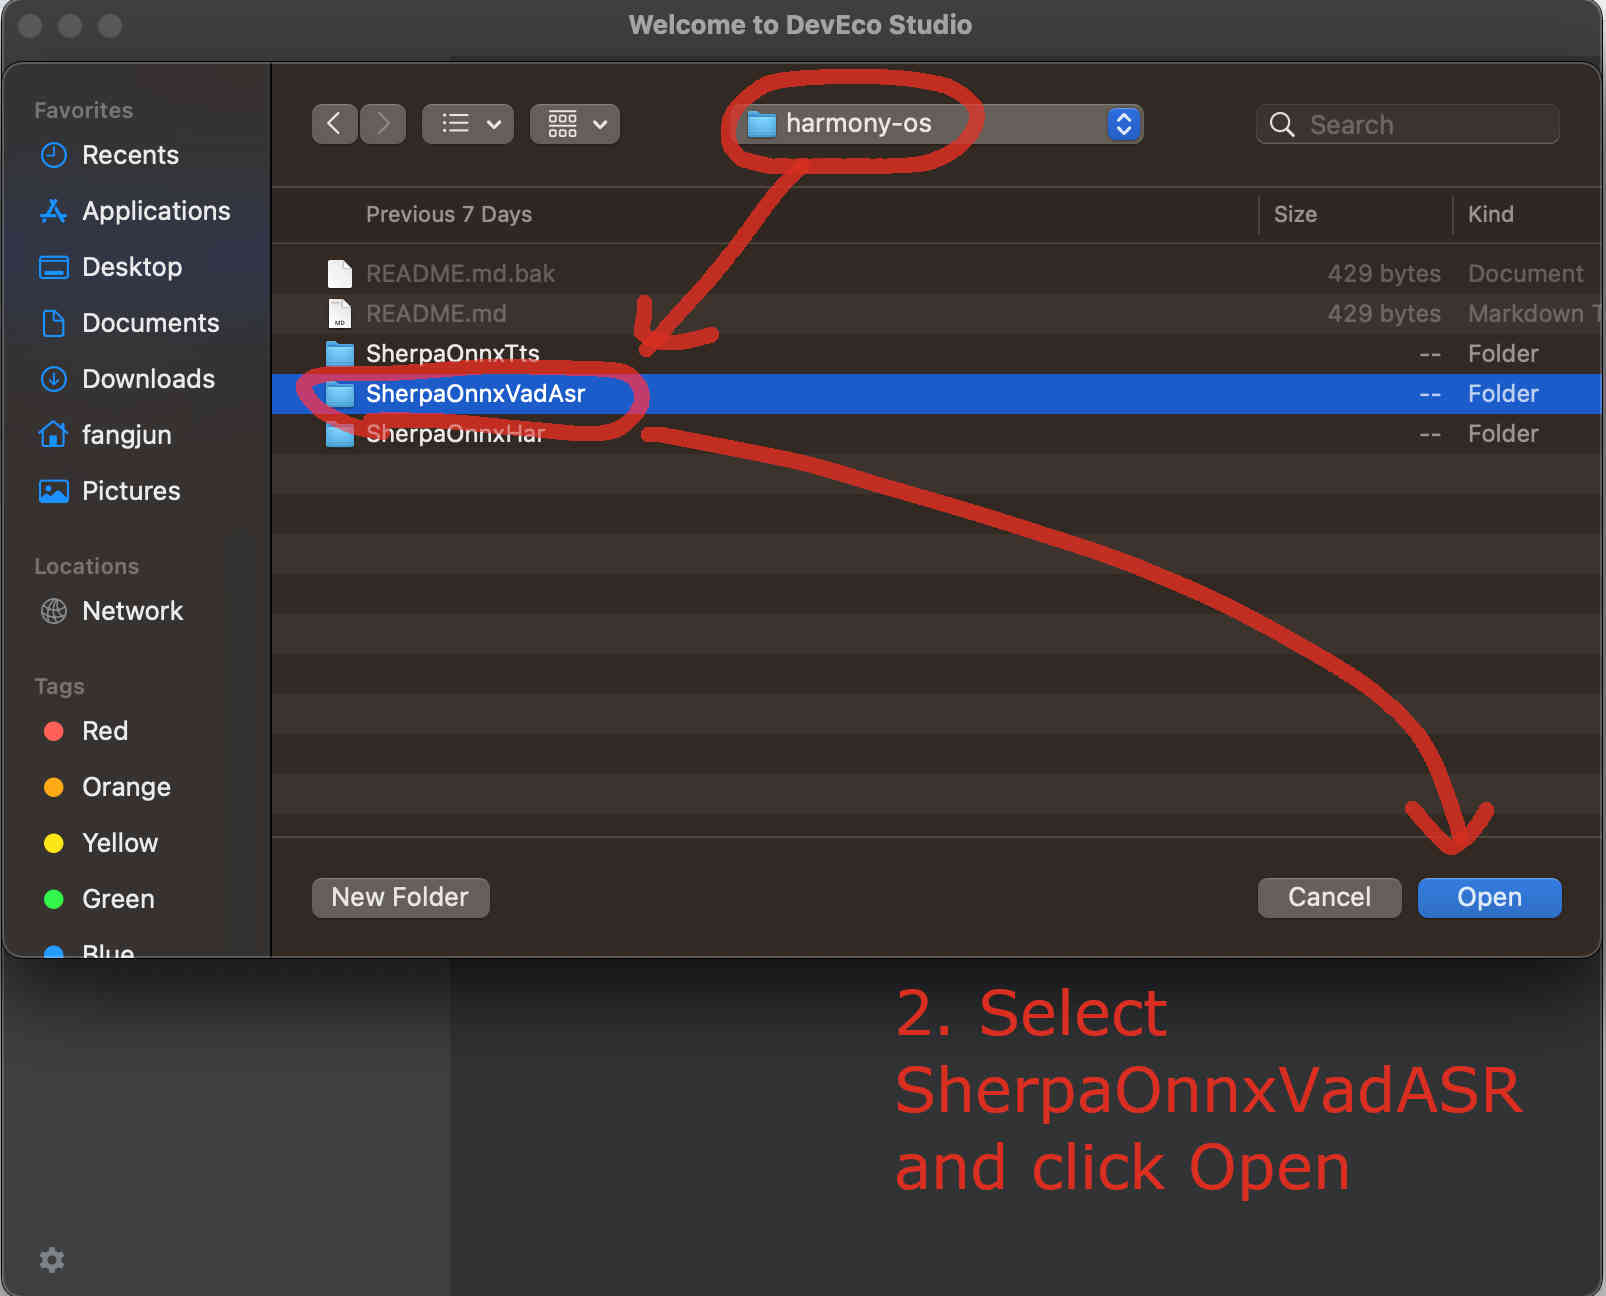
Fig. 75 Step 2: Select SherpaOnnxVadAsr inside the harmony-os folder and click Open
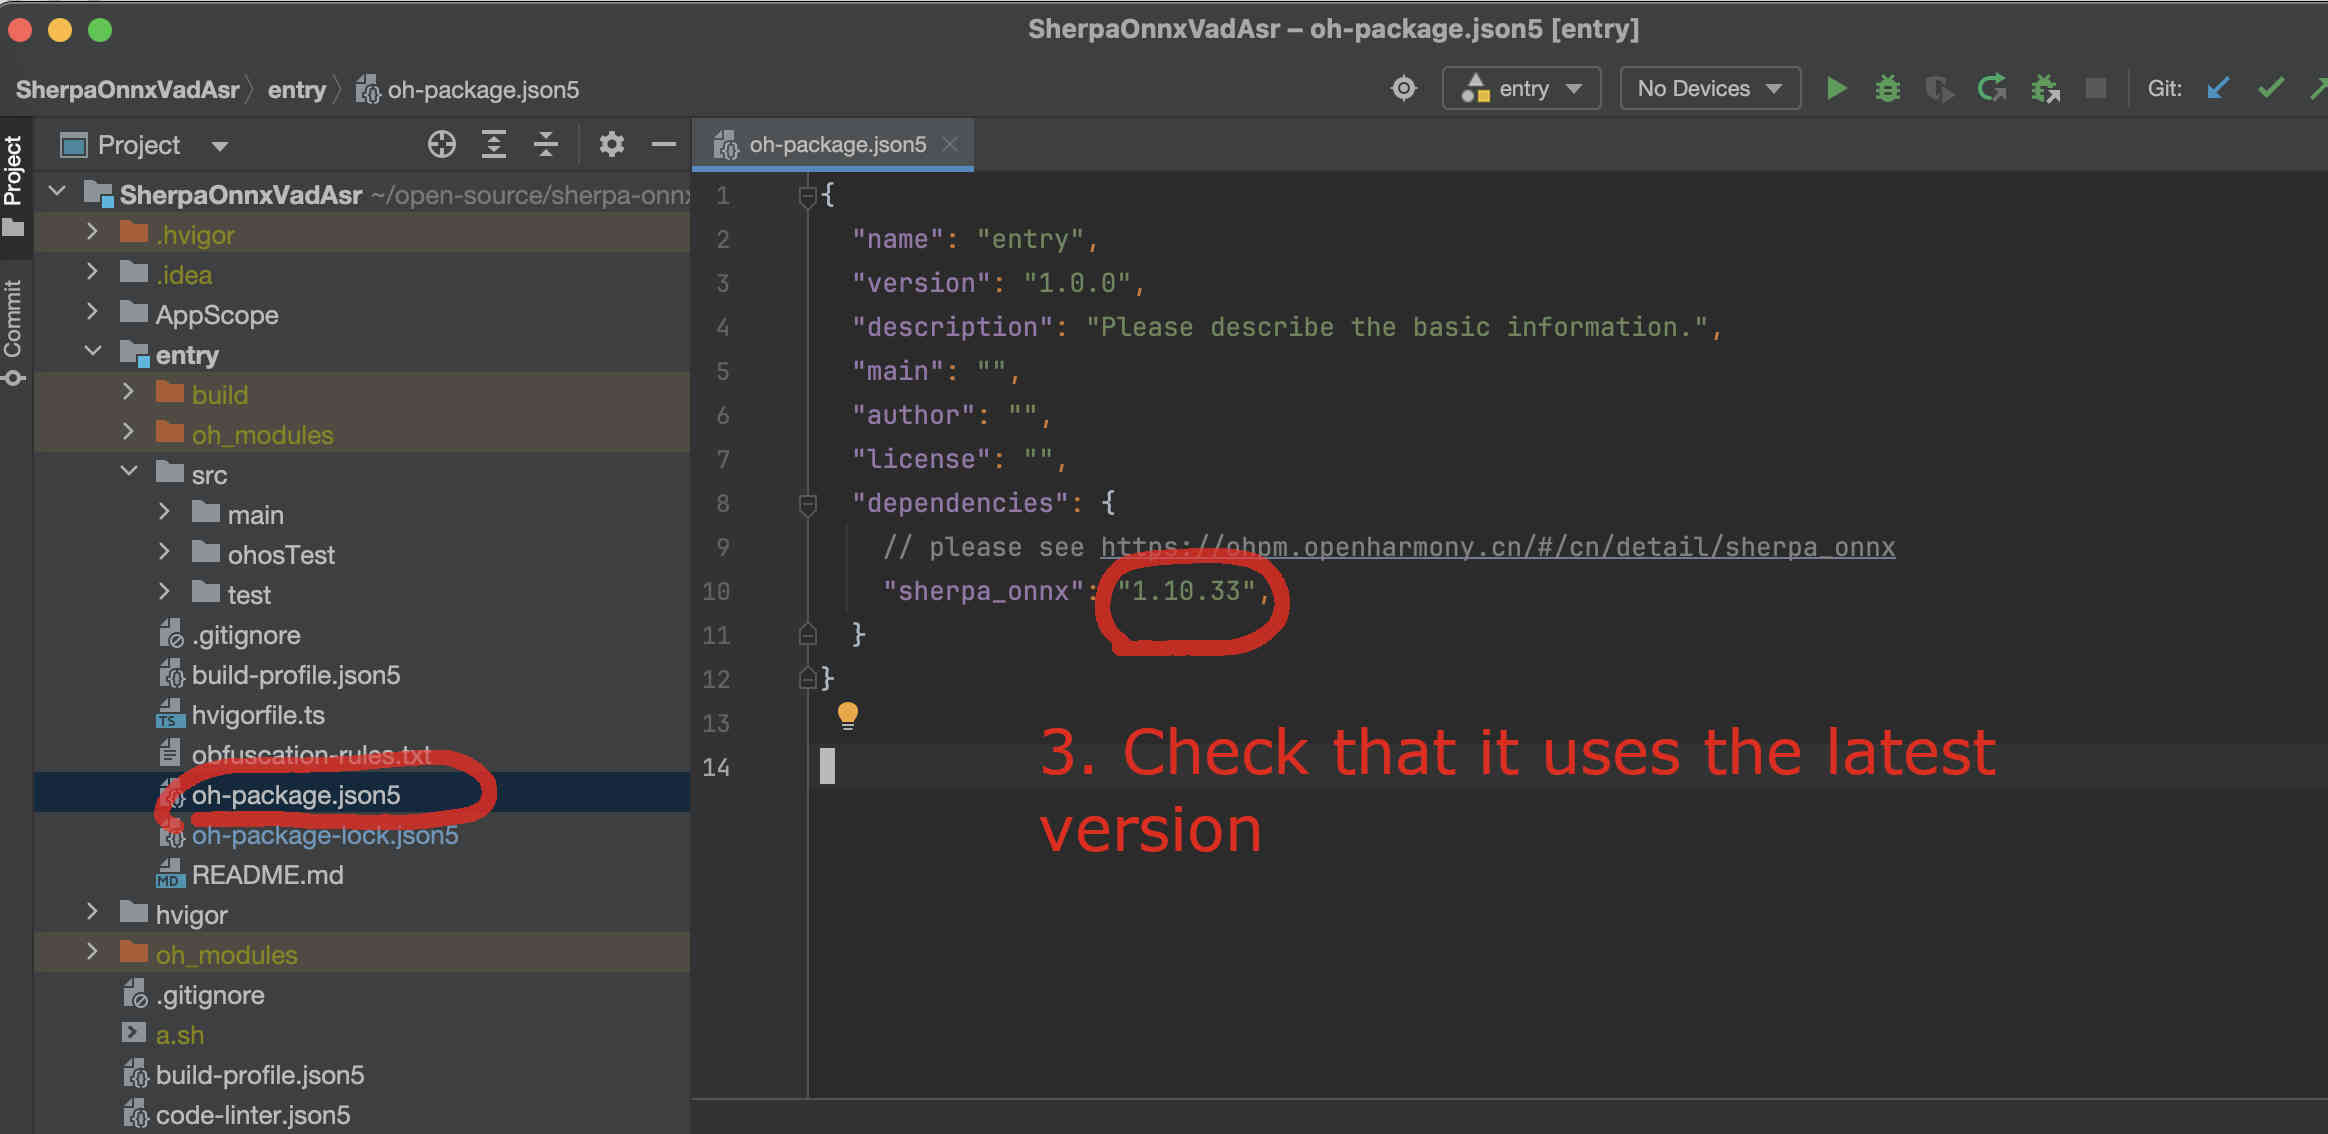
Fig. 76 Step 3: Check that it is using the latest version. You can visit sherpa_onnx to check available versions.
Download a VAD model
The first thing we have to do is to download the VAD model and put it inside the directory rawfile.
Caution: The model MUST be placed inside the directory rawfile.
cd /Users/fangjun/open-source/sherpa-onnx/harmony-os/SherpaOnnxVadAsr/entry/src/main/resources/rawfile
wget https://github.com/k2-fsa/sherpa-onnx/releases/download/asr-models/silero_vad.onnx
Select a non-streaming ASR model
The code supports many non-streaming models from
and we have to modify the code to use the model that we choose.
Hint
You can try the above models at the following huggingface space:
We give two examples below about how to use the following two models:
Use sherpa-onnx-moonshine-tiny-en-int8
First, we download and unzip the model.
Caution: The model MUST be placed inside the directory rawfile.
cd /Users/fangjun/open-source/sherpa-onnx/harmony-os/SherpaOnnxVadAsr/entry/src/main/resources/rawfile
wget https://github.com/k2-fsa/sherpa-onnx/releases/download/asr-models/sherpa-onnx-moonshine-tiny-en-int8.tar.bz2
tar xvf sherpa-onnx-moonshine-tiny-en-int8.tar.bz2
rm sherpa-onnx-moonshine-tiny-en-int8.tar.bz2

# Remove unused files
rm -rf sherpa-onnx-moonshine-tiny-en-int8/test_wavs
Please check that your directory looks exactly like the following at this point:
(py38) fangjuns-MacBook-Pro:rawfile fangjun$ pwd
/Users/fangjun/open-source/sherpa-onnx/harmony-os/SherpaOnnxVadAsr/entry/src/main/resources/rawfile

(py38) fangjuns-MacBook-Pro:rawfile fangjun$ ls -lh
total 3536
drwxr-xr-x  9 fangjun  staff   288B Dec  6 15:42 sherpa-onnx-moonshine-tiny-en-int8
-rw-r--r--  1 fangjun  staff   1.7M Nov 28 18:13 silero_vad.onnx

(py38) fangjuns-MacBook-Pro:rawfile fangjun$ tree .
.
├── sherpa-onnx-moonshine-tiny-en-int8
│   ├── LICENSE
│   ├── README.md
│   ├── cached_decode.int8.onnx
│   ├── encode.int8.onnx
│   ├── preprocess.onnx
│   ├── tokens.txt
│   └── uncached_decode.int8.onnx
└── silero_vad.onnx

1 directory, 8 files
Now you should see the following inside DevEco Studio:
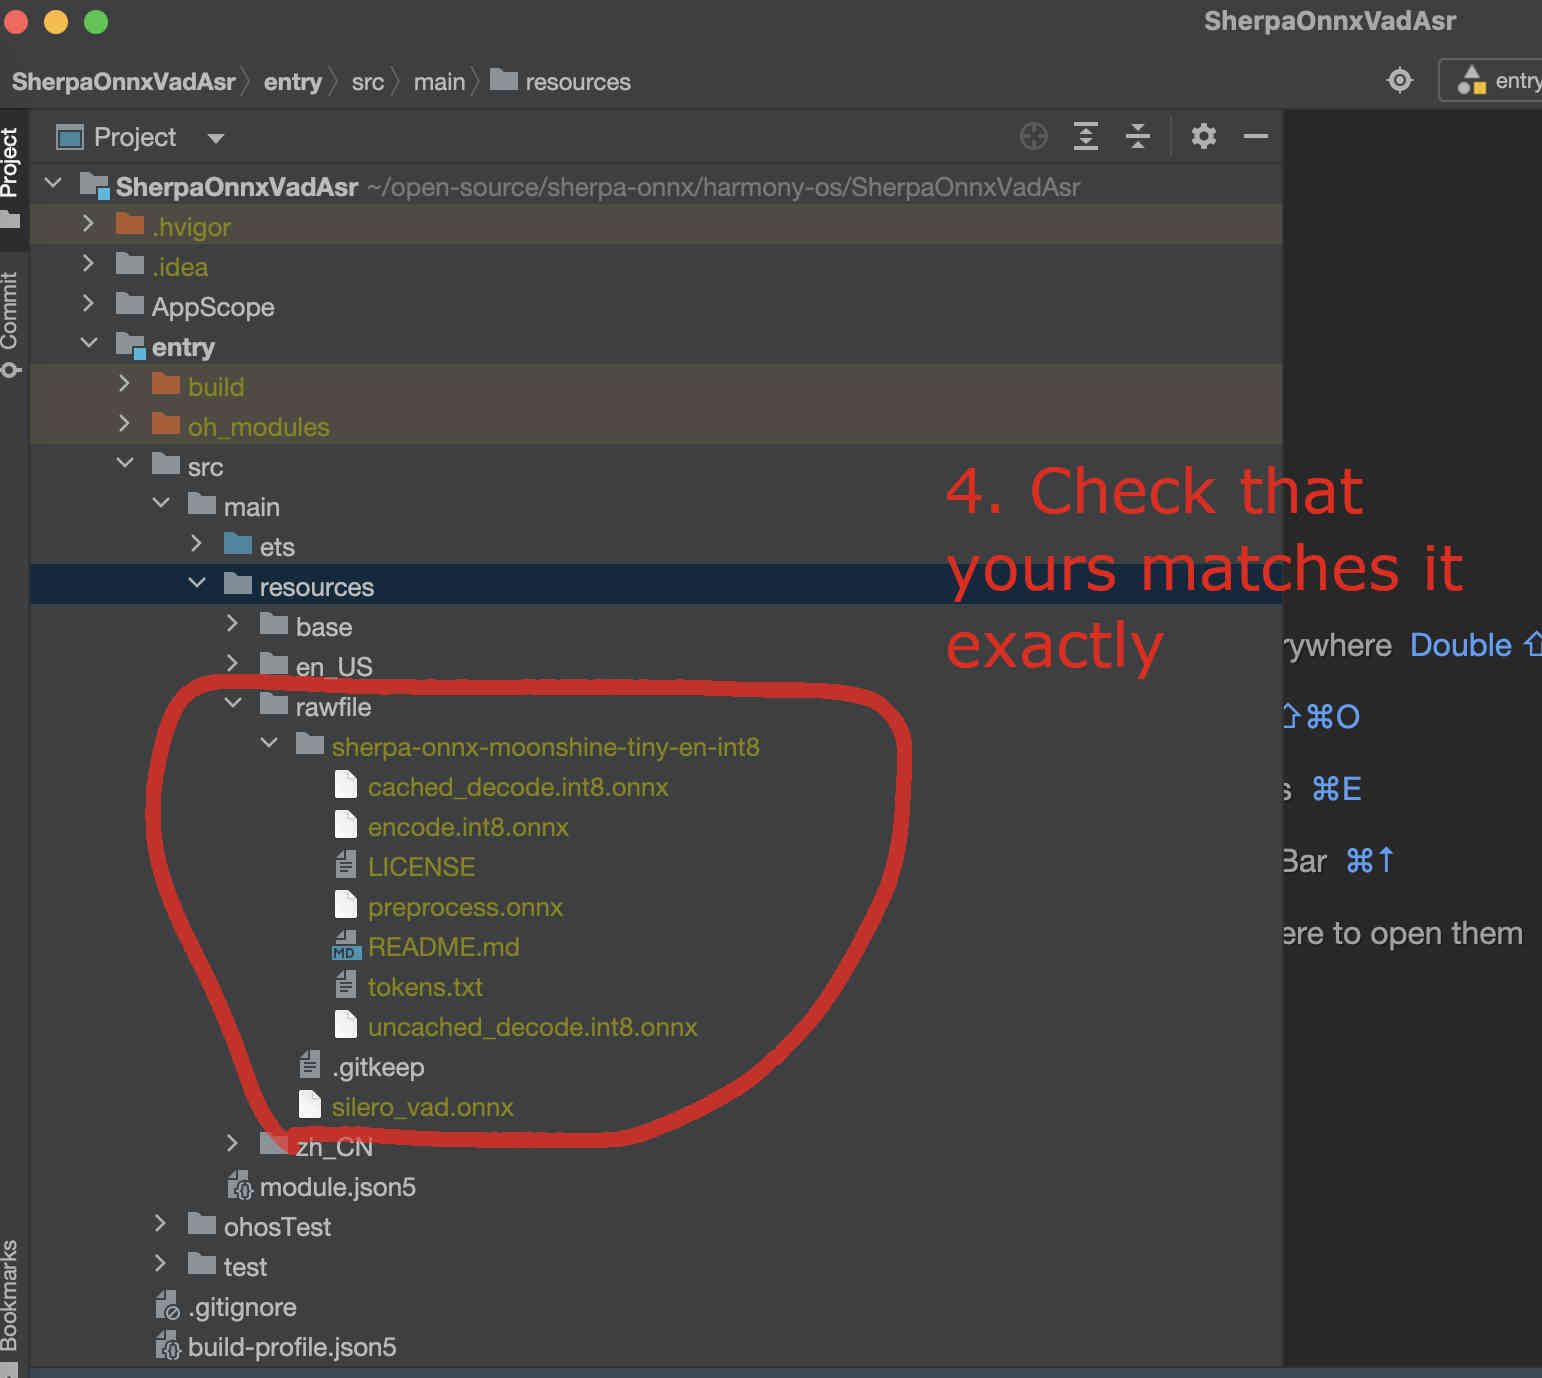
Fig. 77 Step 4: Check the model directory inside the rawfile directory.
Now it is time to modify the code to use our model.
We need to change NonStreamingAsrWithVadWorker.ets.
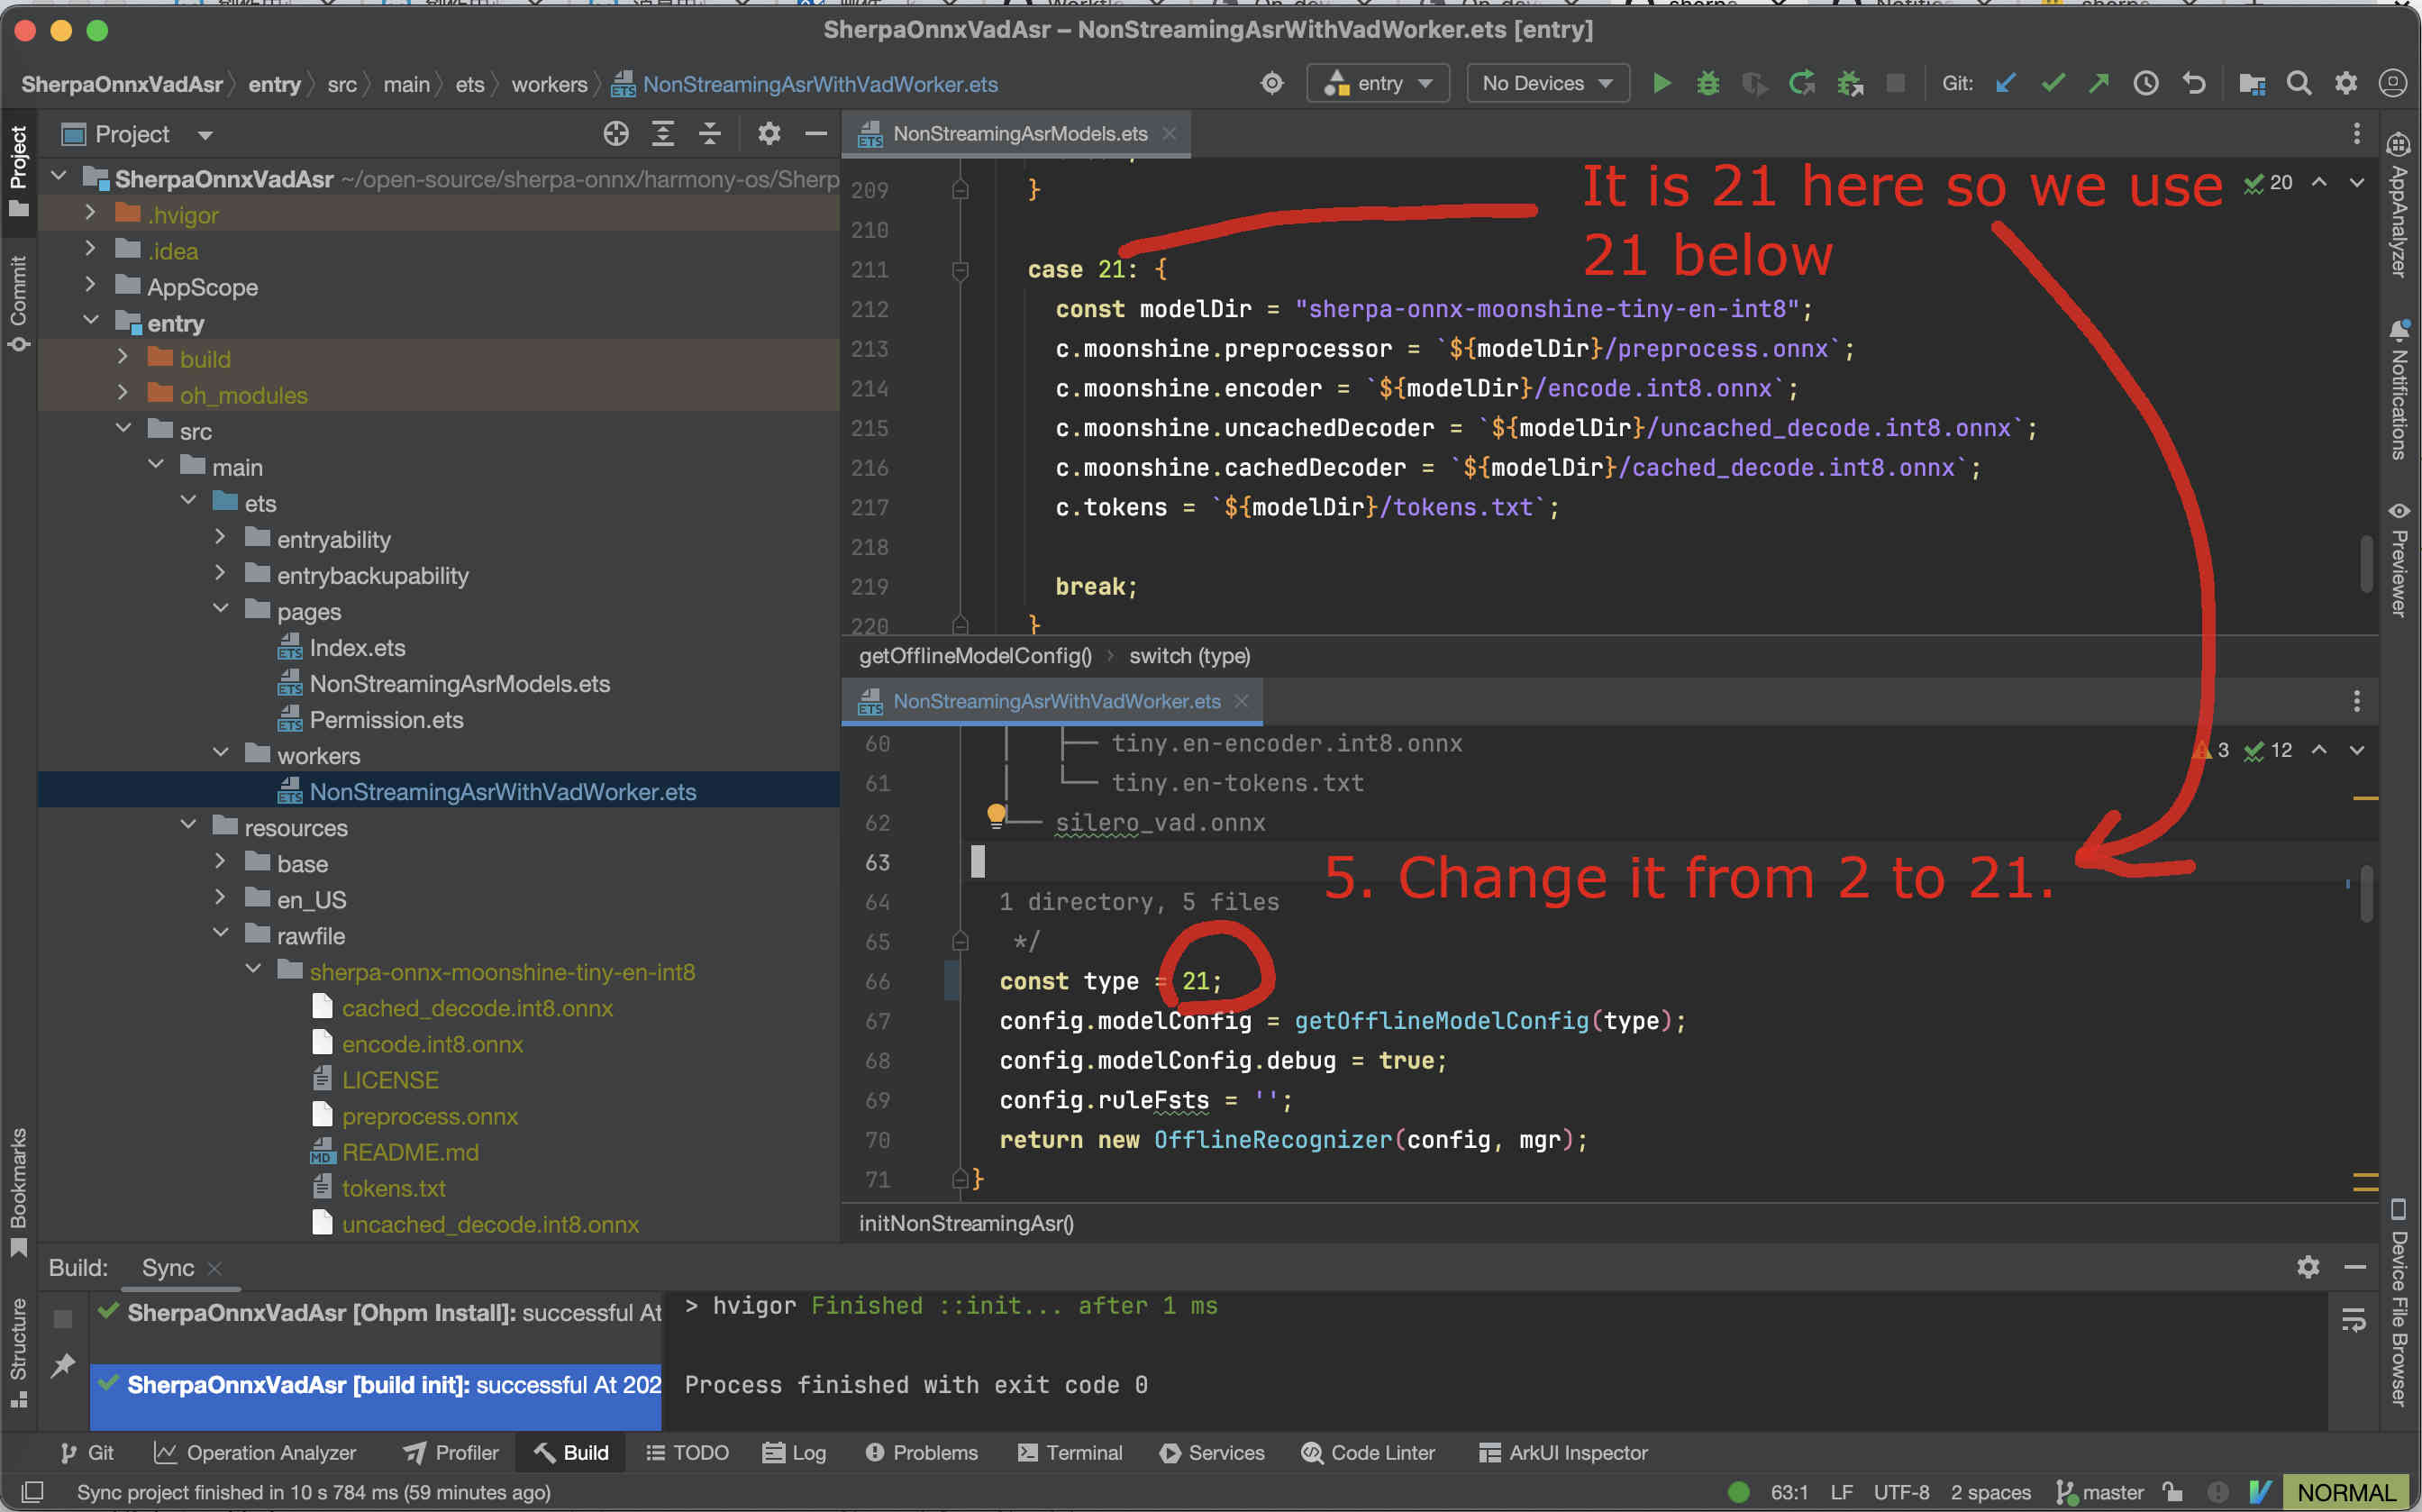
Fig. 78 Step 5: Change the code to use our selected model
Finally, we can build the project. See the screenshot below:
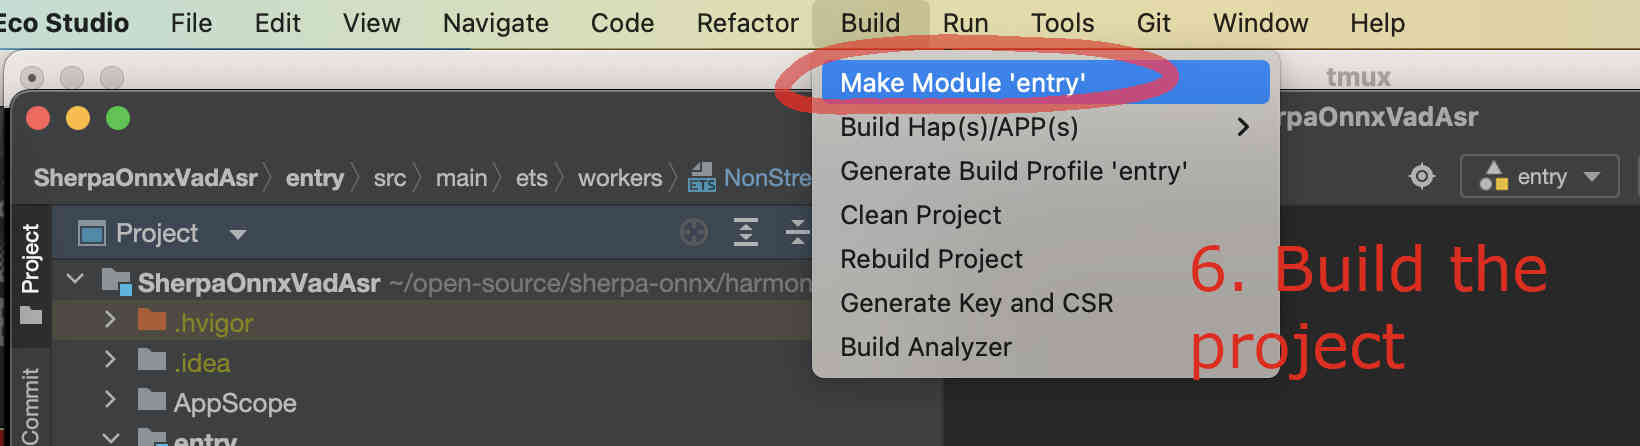
Fig. 79 Step 6: Build the project
If you have an emulator, you can now start it.
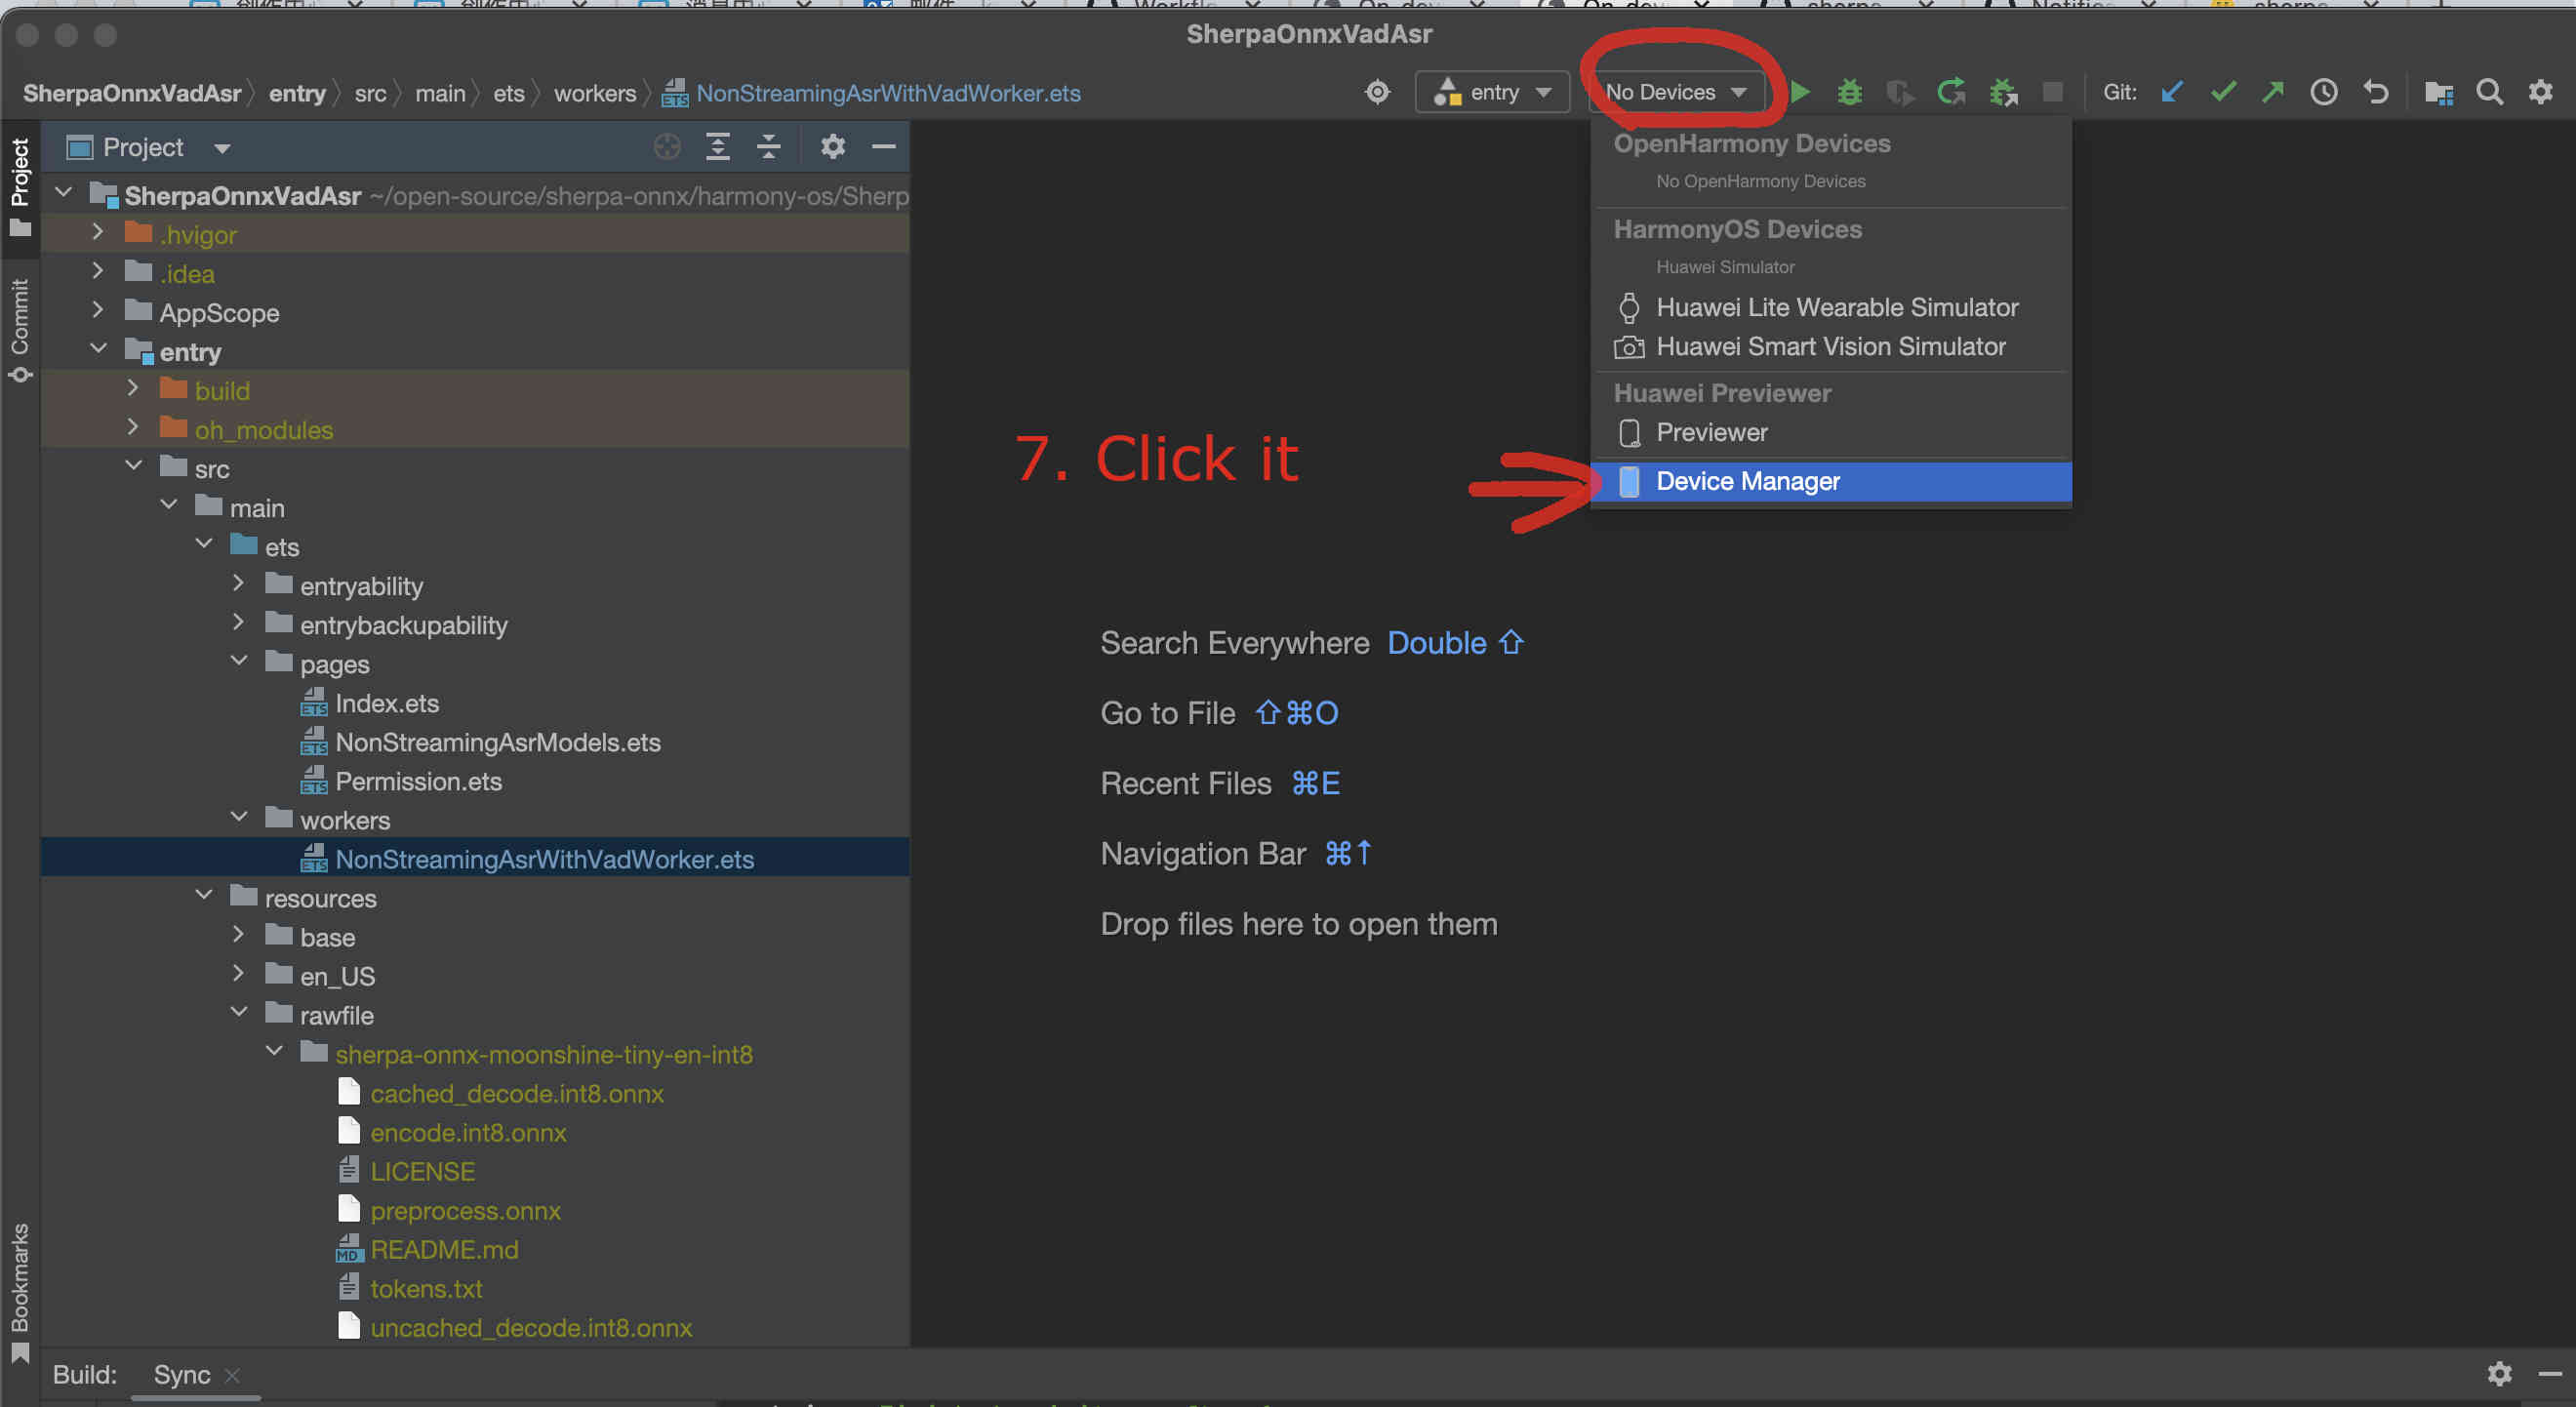
Fig. 80 Step 7: Select the device manager
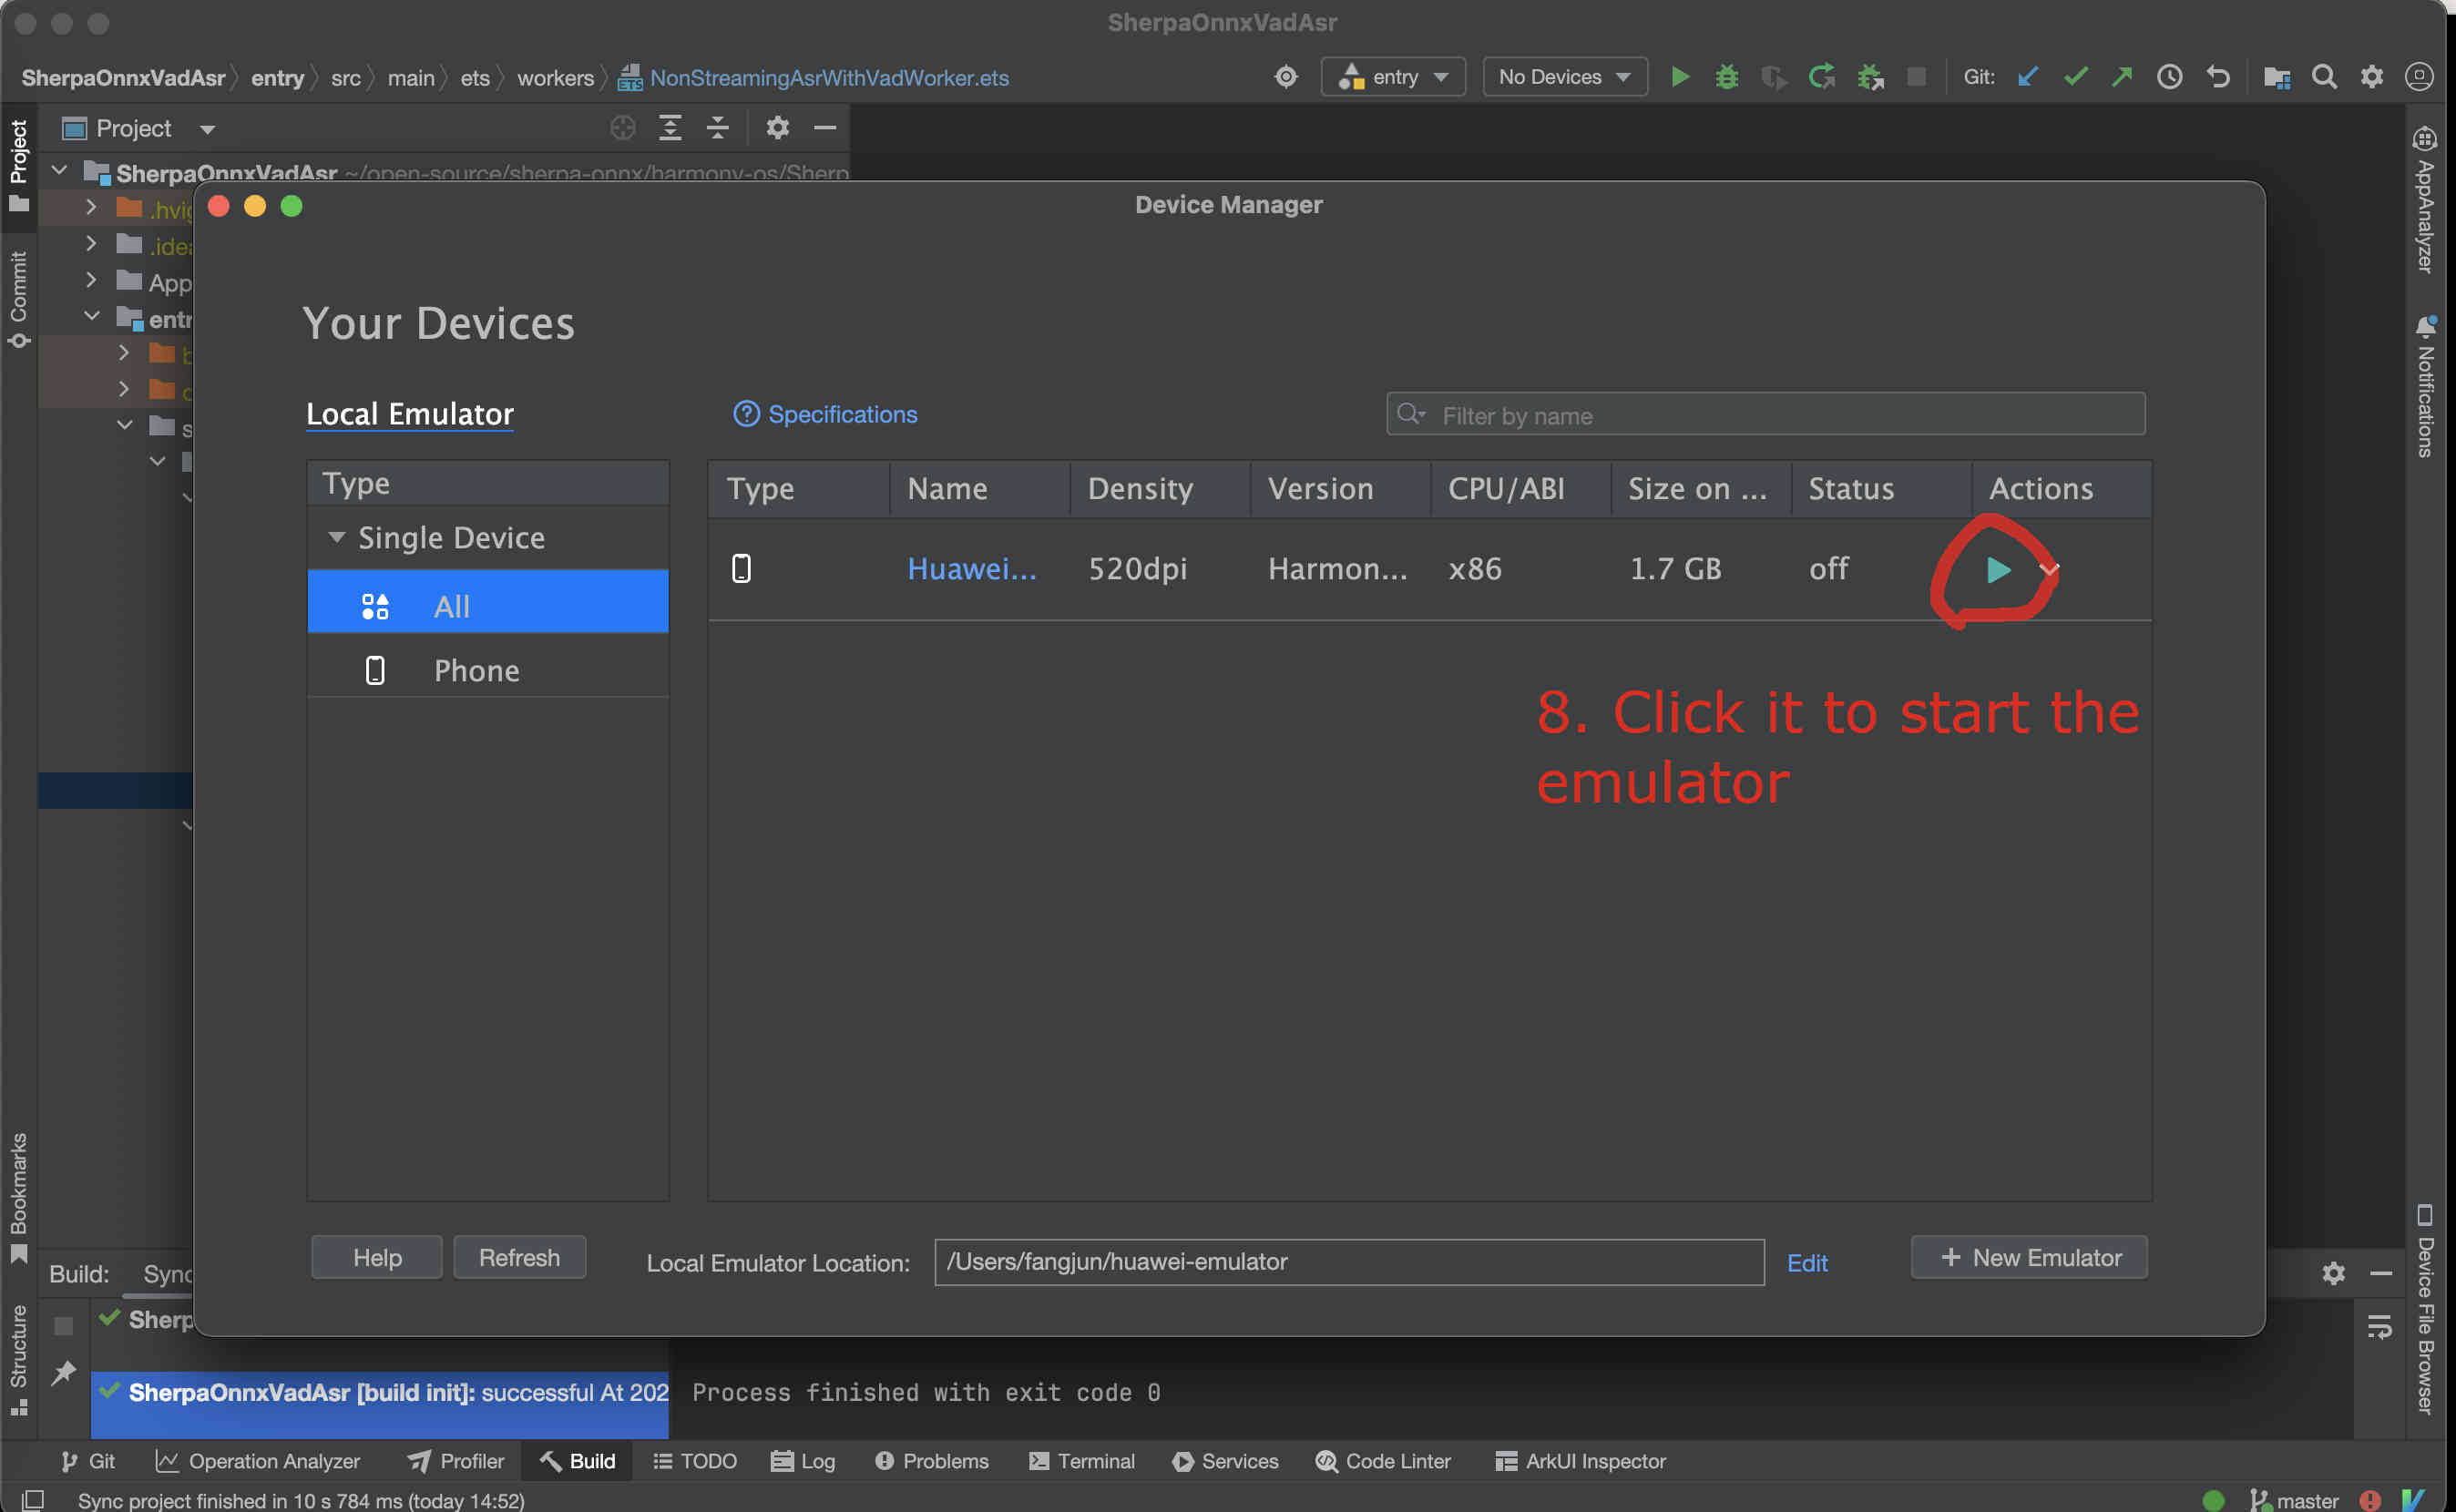
Fig. 81 Step 8: Start the emulator
After the emulator is started, follow the screenshot below to run the app on the emulator:
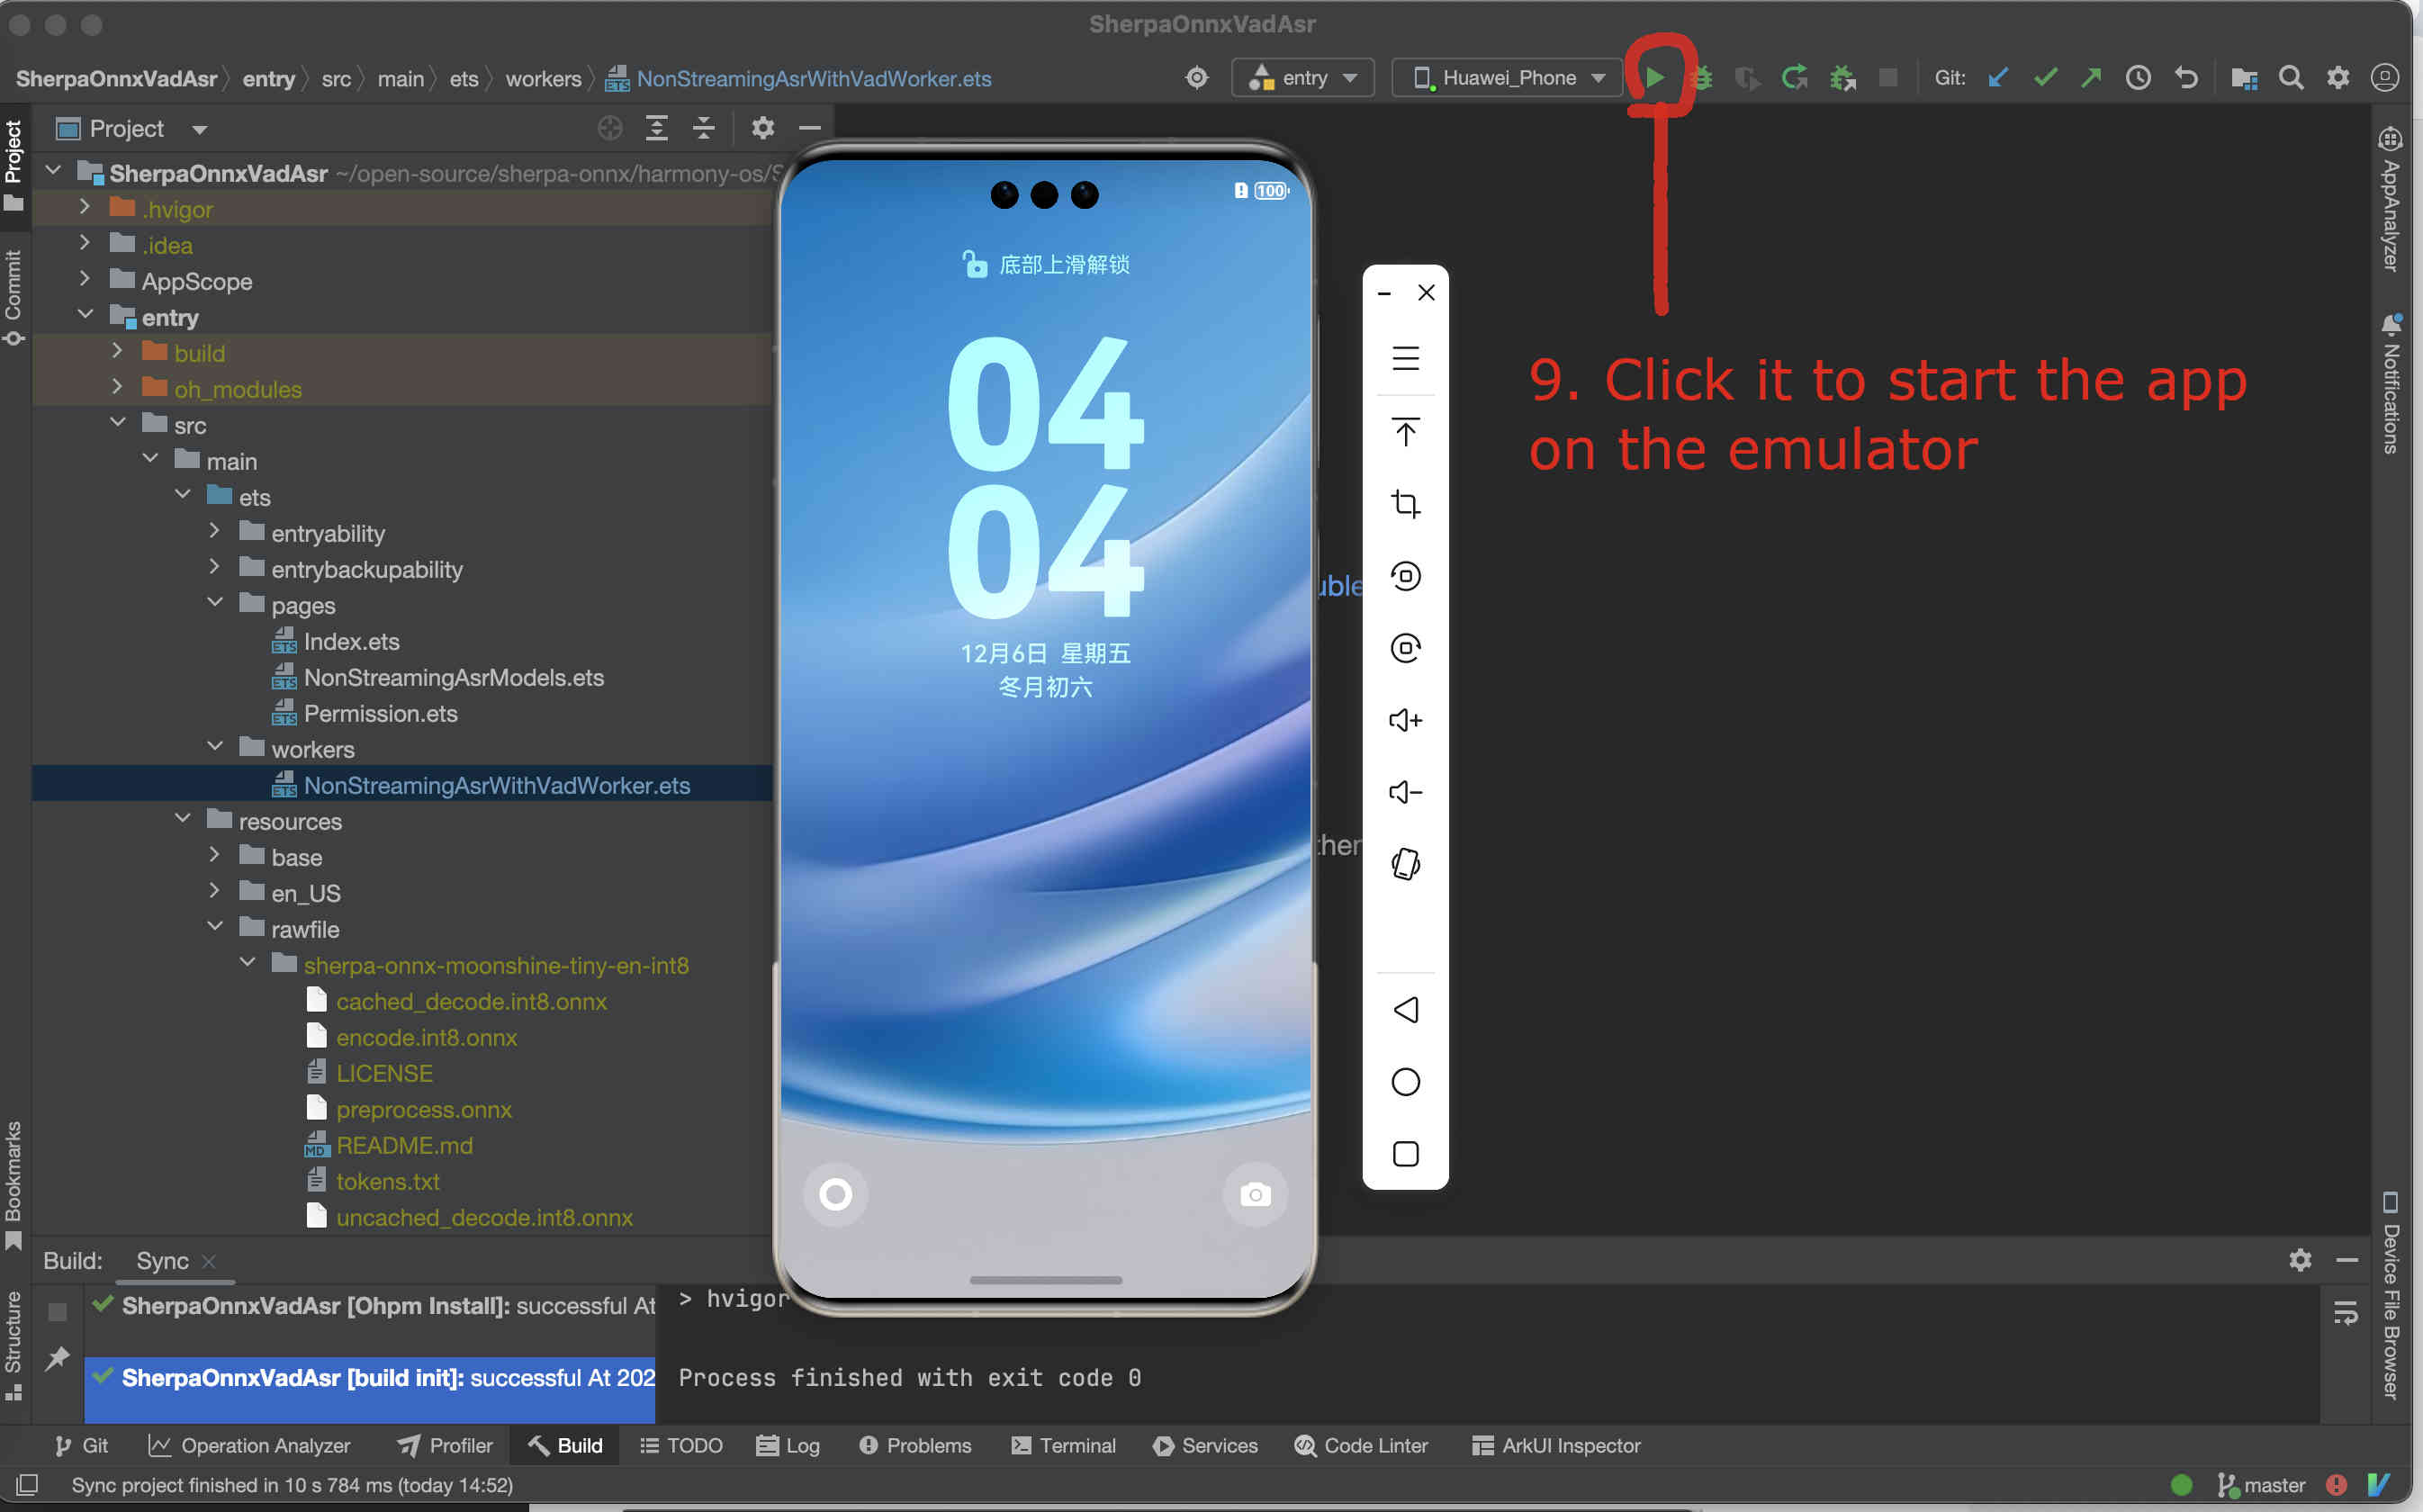
Fig. 82 Step 9: Start the app on the emulator
You should see something like below:
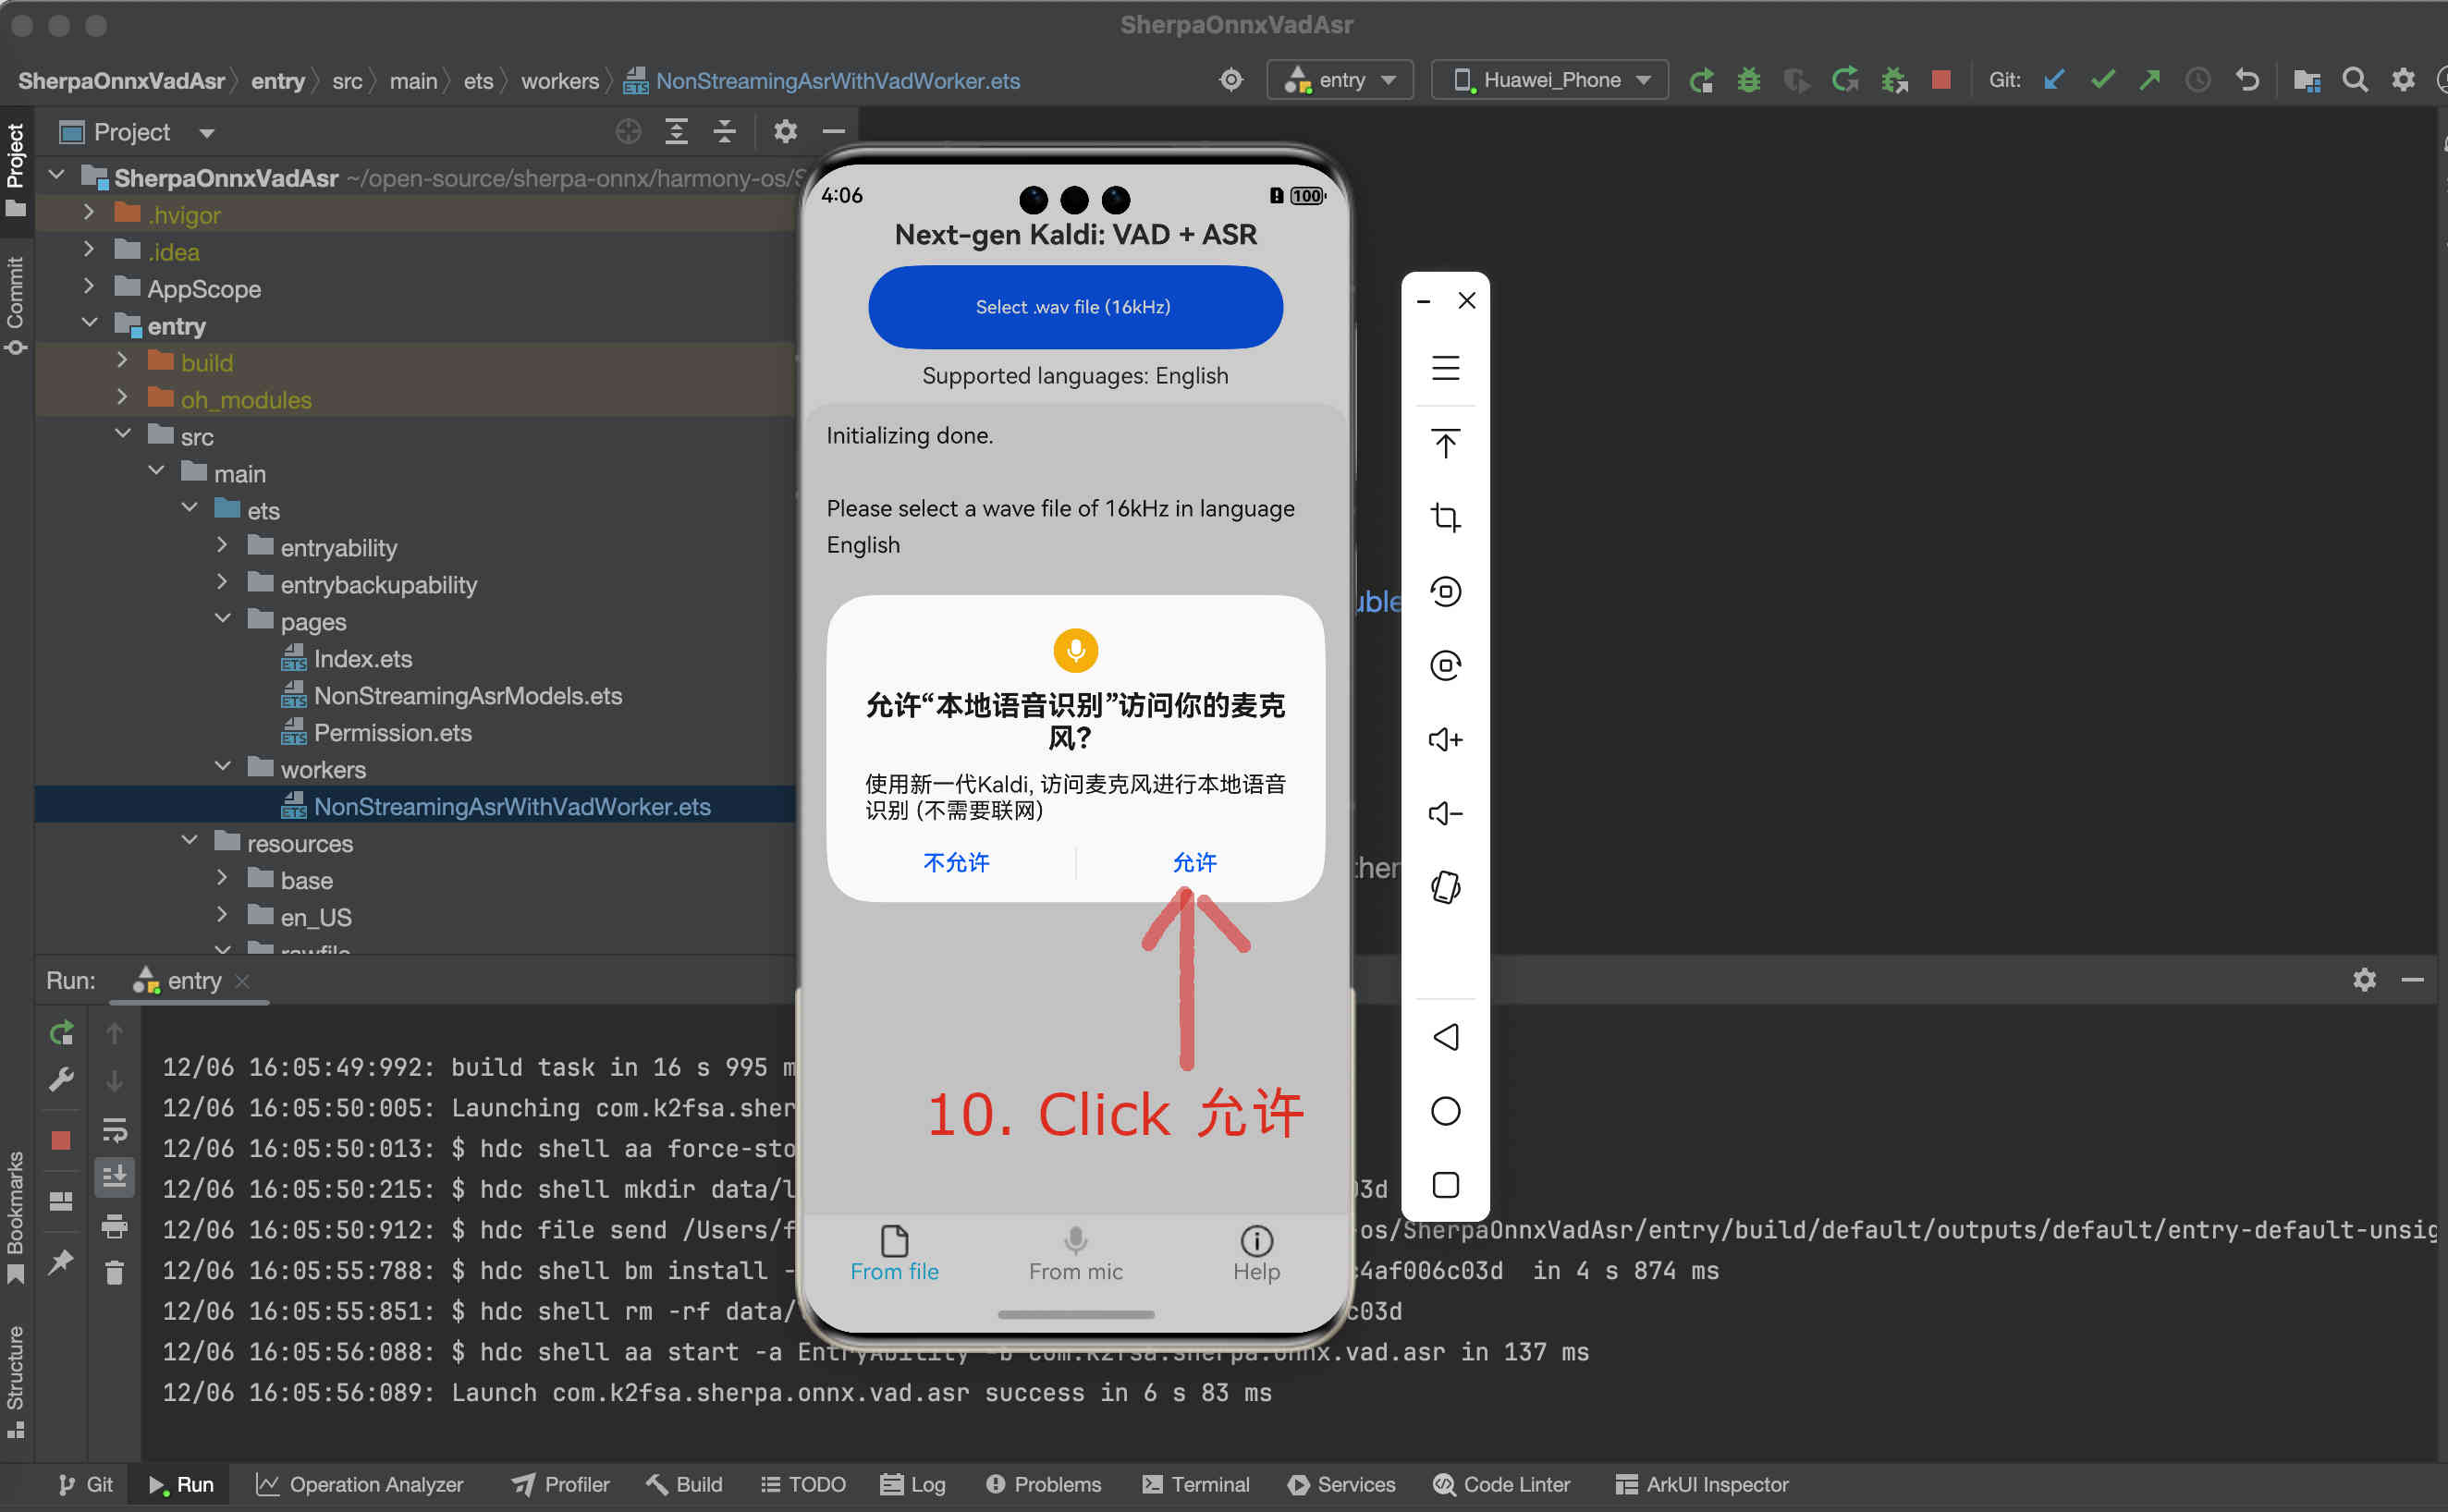
Fig. 83 Step 10: Click Allow to allow the app to access the microphone
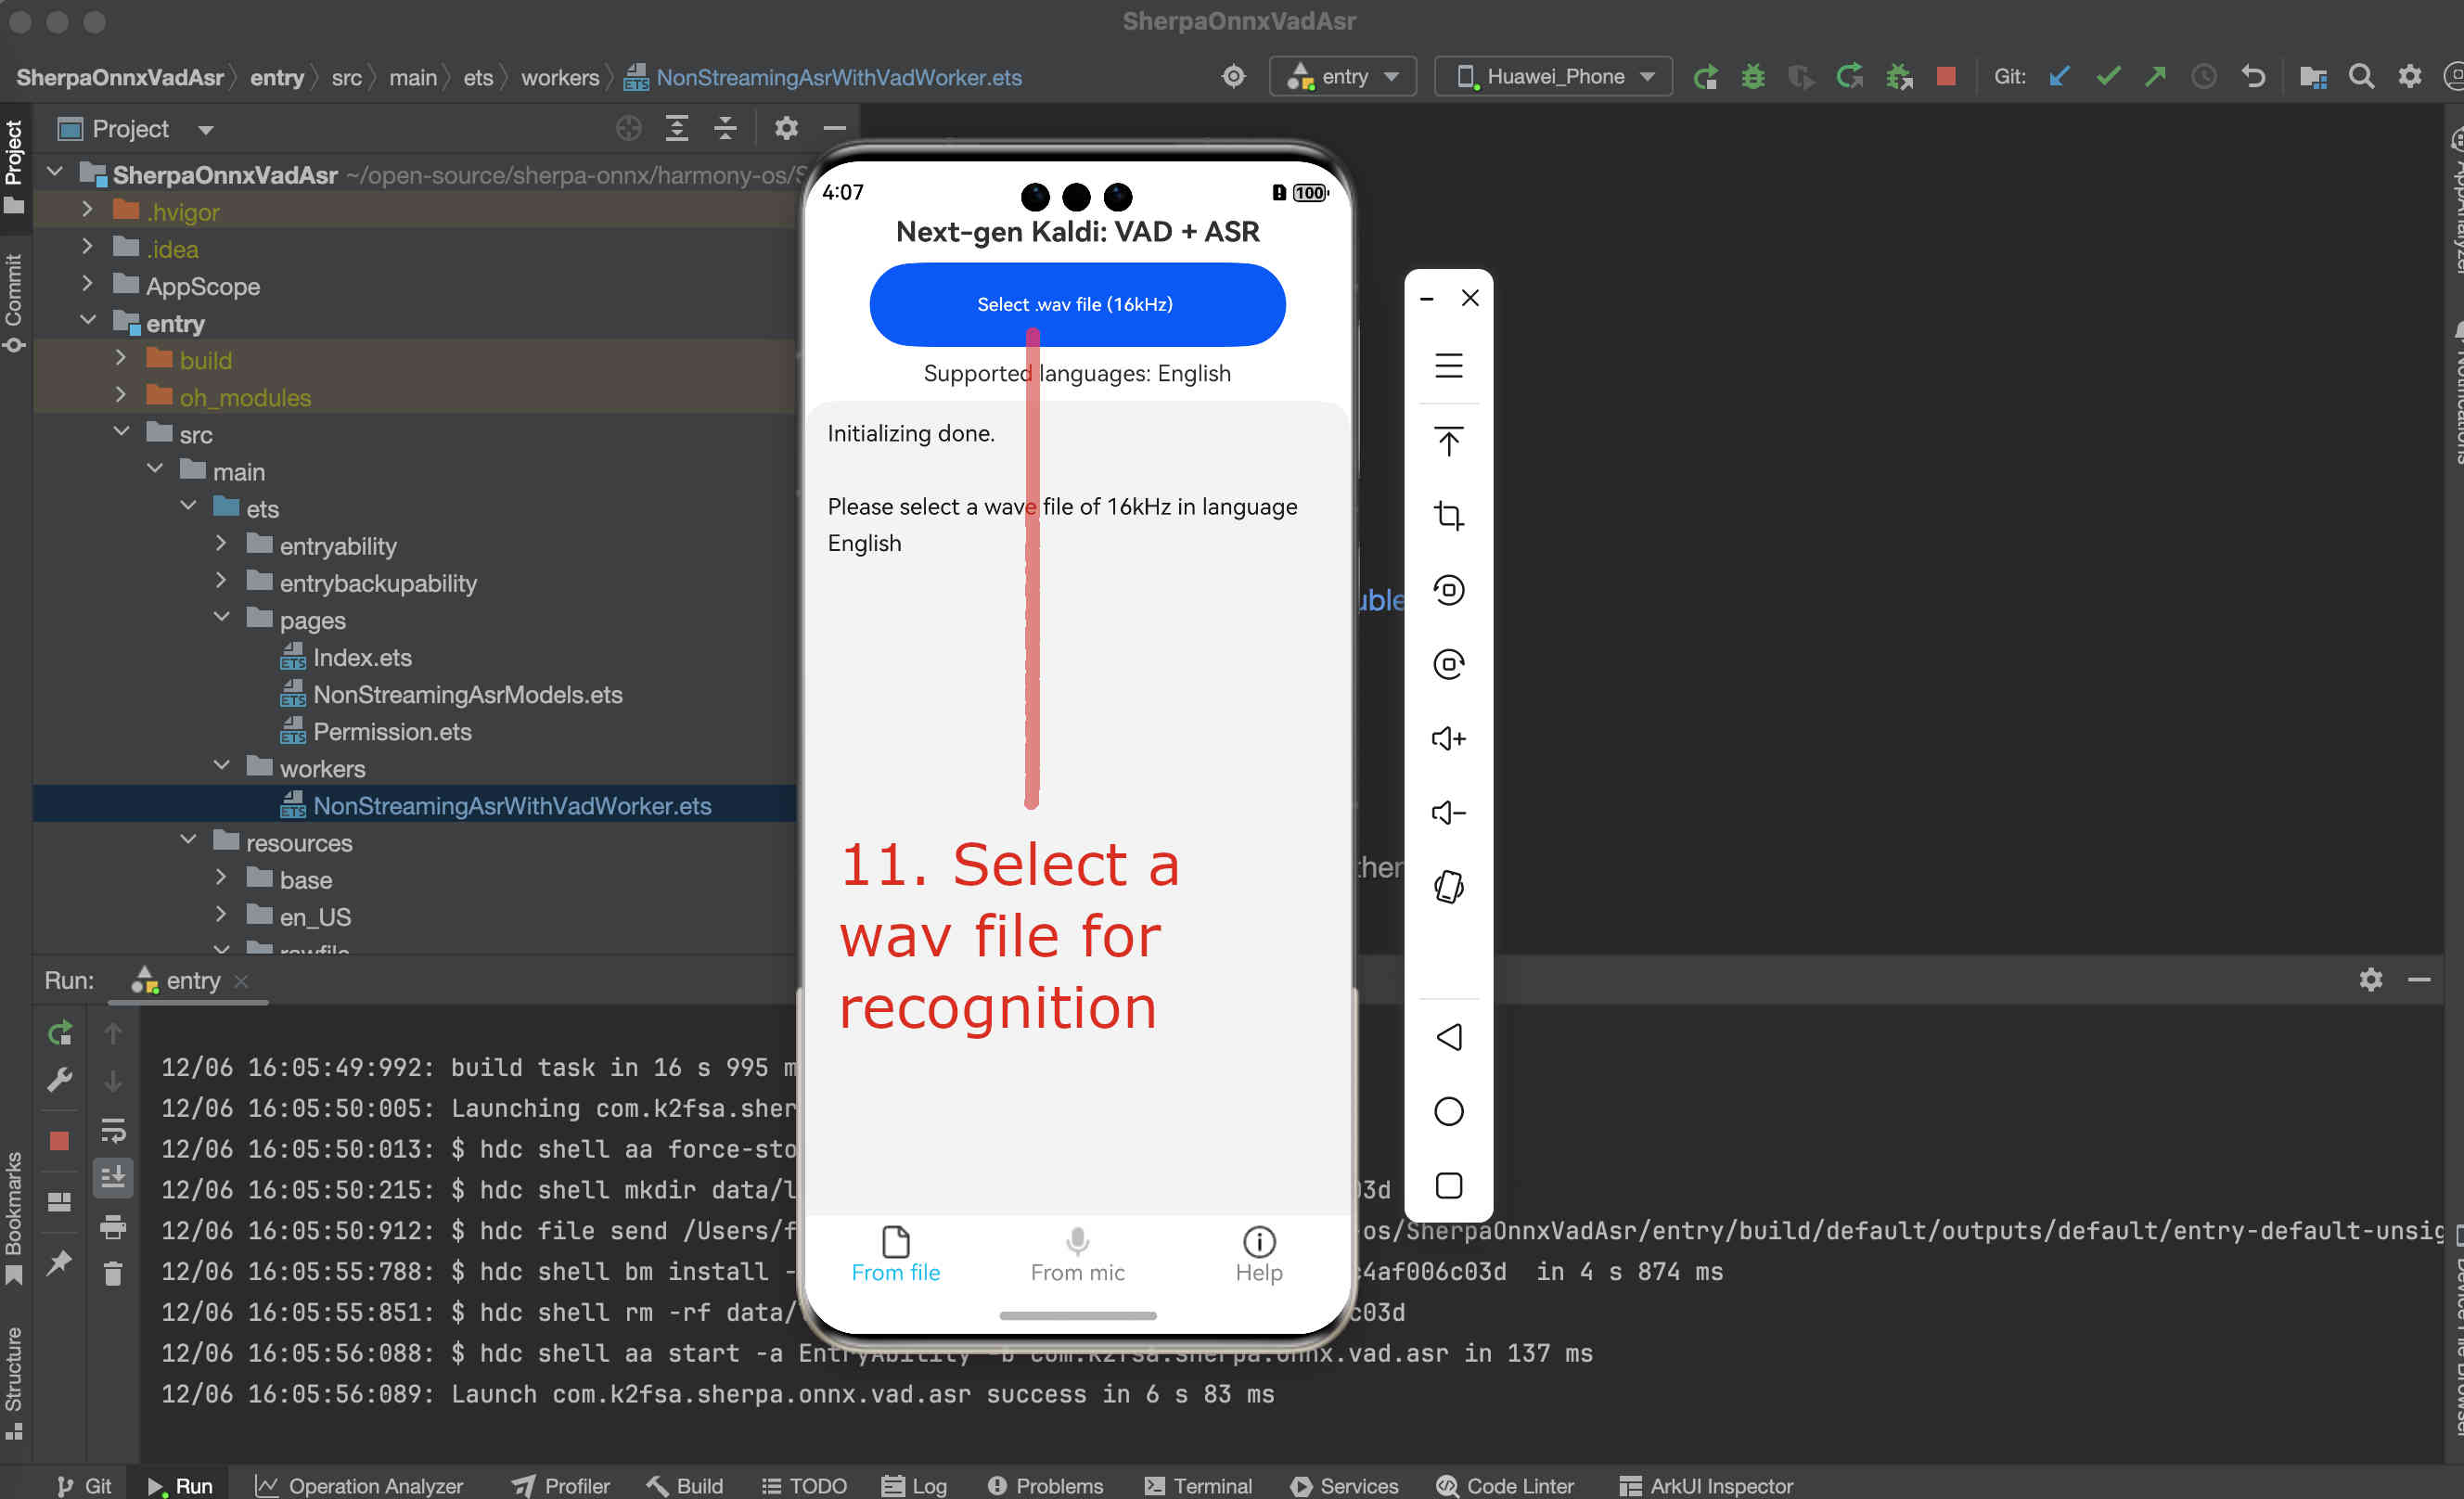
Fig. 84 Step 11: Select a .wav file for recognition
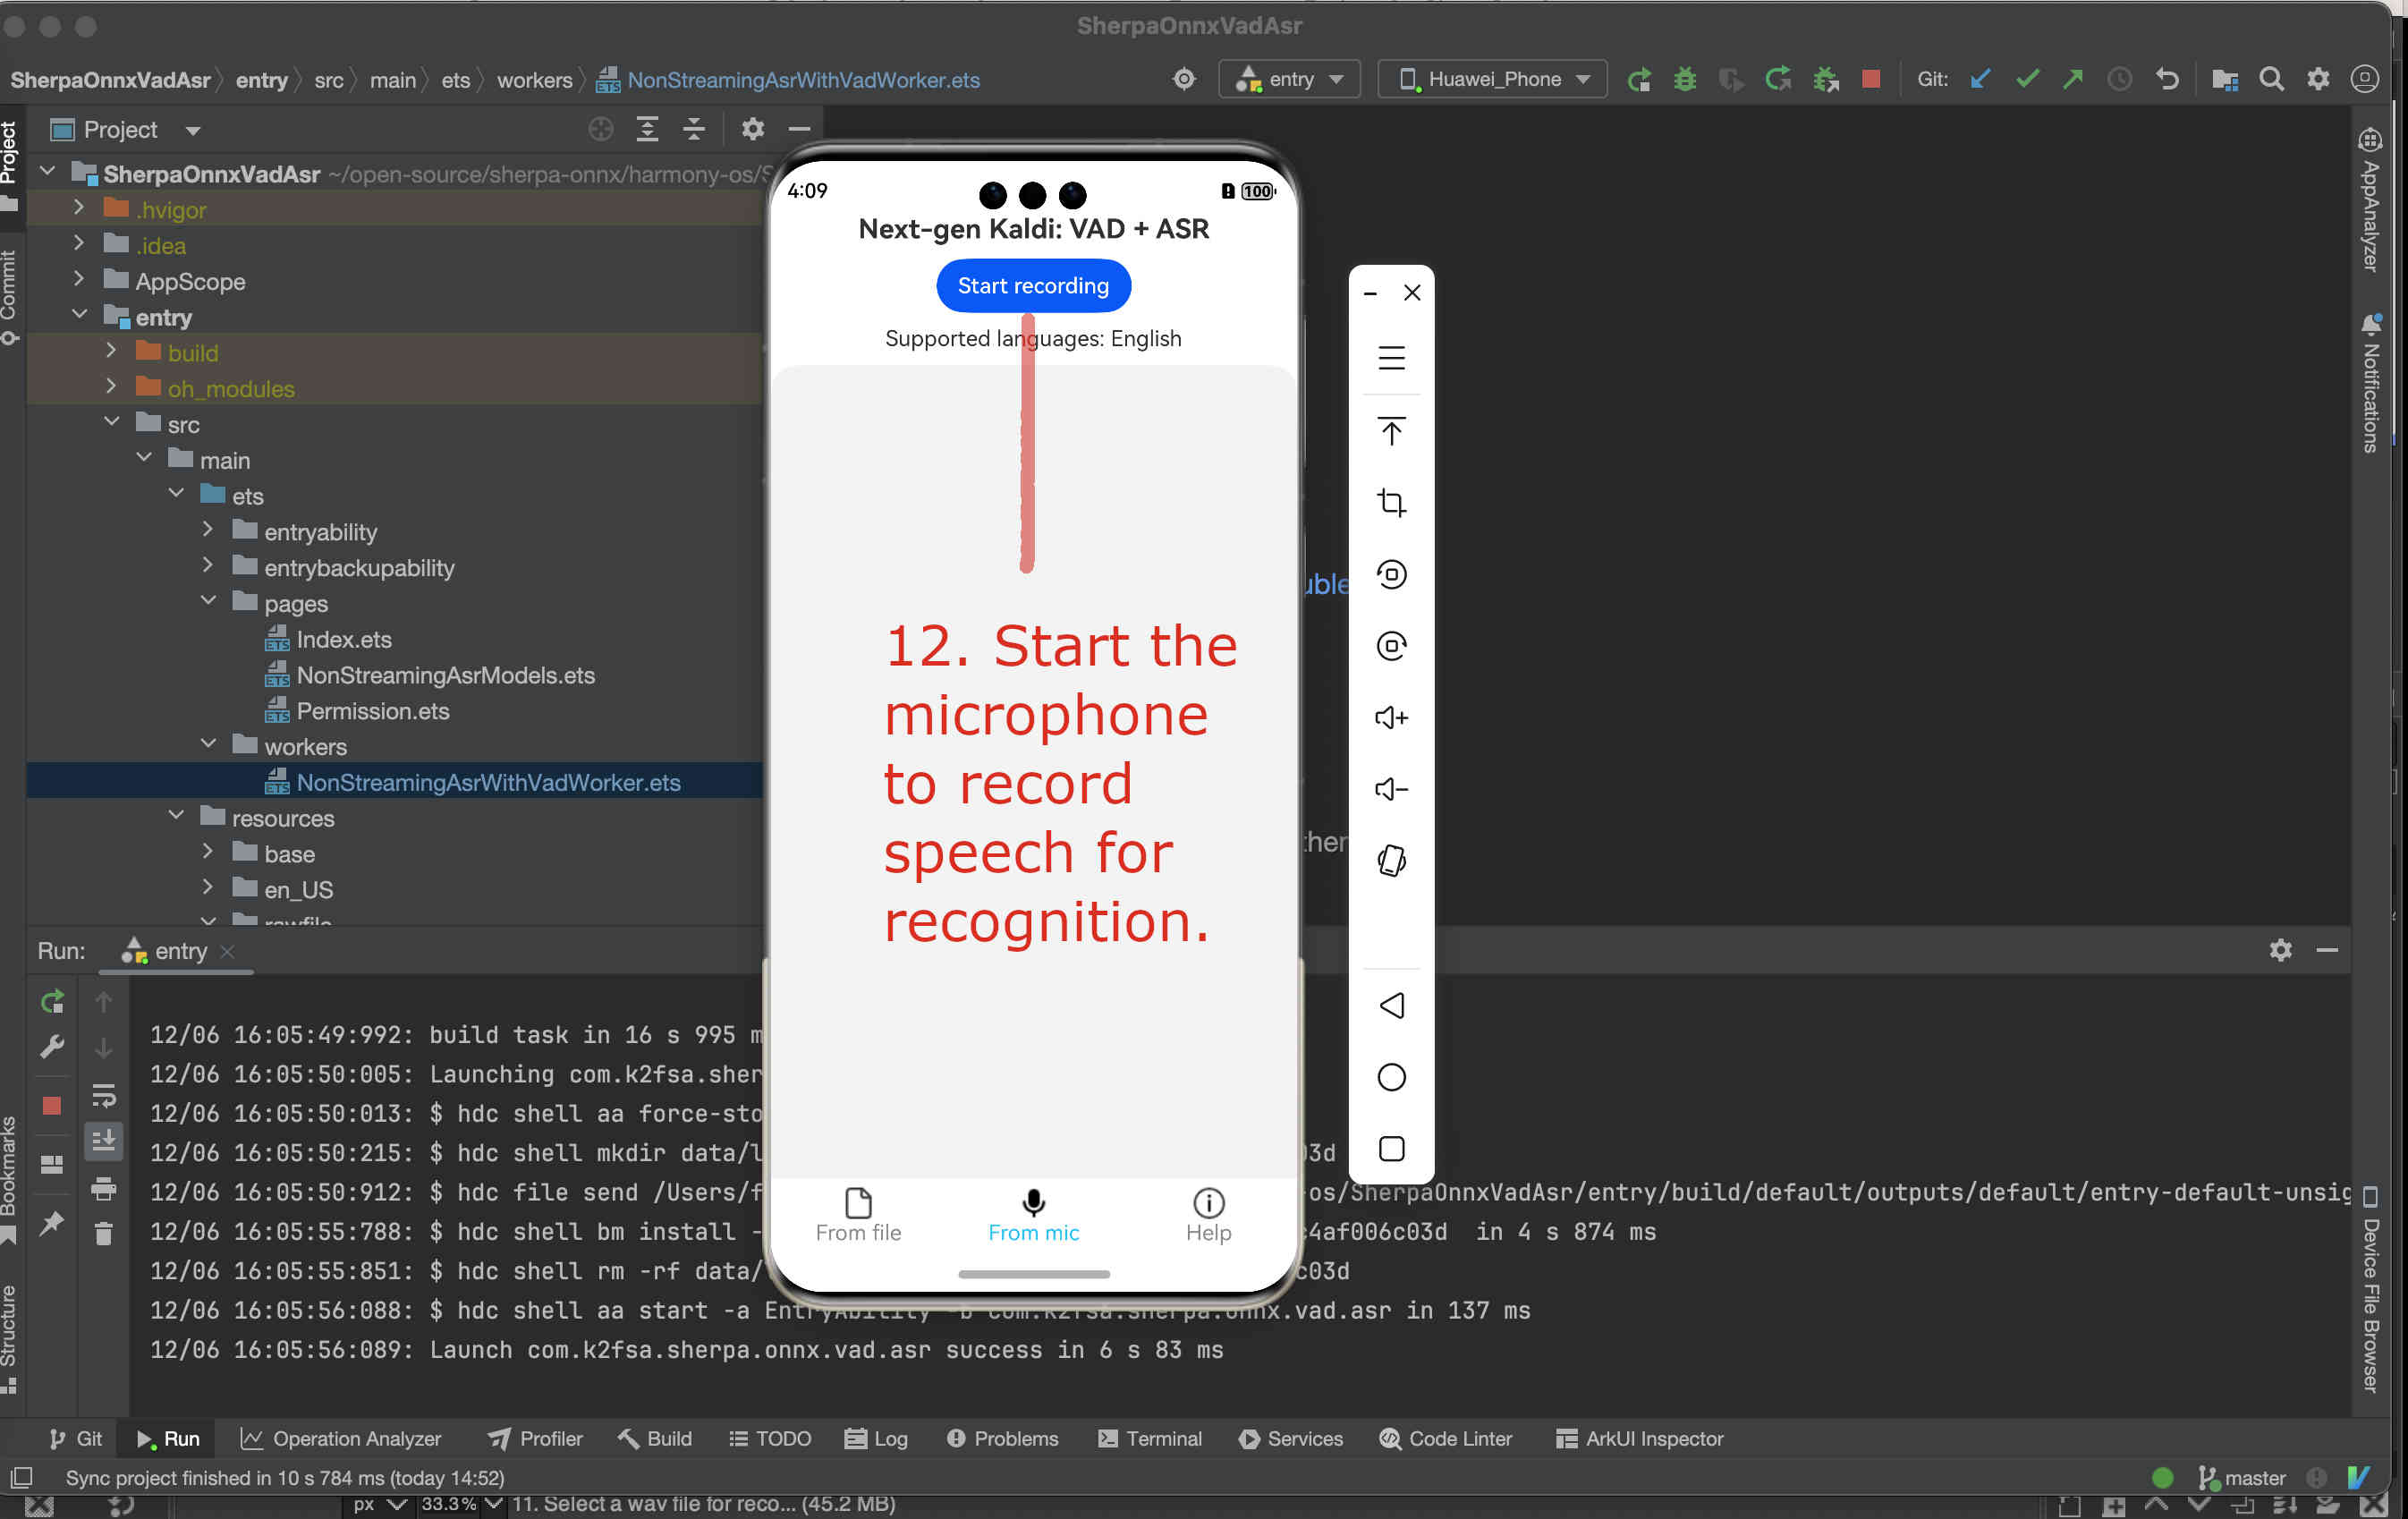
Fig. 85 Step 12: Start the microphone to record speech for recognition
Congratulations!
You have successfully run a on-device non-streaming speech recognition APP on HarmonyOS!
Use sherpa-onnx-sense-voice-zh-en-ja-ko-yue-2024-07-17
First, we download and unzip the model.
Caution: The model MUST be placed inside the directory rawfile.
cd /Users/fangjun/open-source/sherpa-onnx/harmony-os/SherpaOnnxVadAsr/entry/src/main/resources/rawfile
wget https://github.com/k2-fsa/sherpa-onnx/releases/download/asr-models/sherpa-onnx-sense-voice-zh-en-ja-ko-yue-2024-07-17.tar.bz2
tar xvf sherpa-onnx-sense-voice-zh-en-ja-ko-yue-2024-07-17.tar.bz2
rm sherpa-onnx-sense-voice-zh-en-ja-ko-yue-2024-07-17.tar.bz2

# Remove unused files
rm -rf sherpa-onnx-sense-voice-zh-en-ja-ko-yue-2024-07-17/test_wavs
rm sherpa-onnx-sense-voice-zh-en-ja-ko-yue-2024-07-17/model.onnx
Please check that your directory looks exactly like the following at this point:
(py38) fangjuns-MacBook-Pro:rawfile fangjun$ pwd
/Users/fangjun/open-source/sherpa-onnx/harmony-os/SherpaOnnxVadAsr/entry/src/main/resources/rawfile

(py38) fangjuns-MacBook-Pro:rawfile fangjun$ ls
sherpa-onnx-sense-voice-zh-en-ja-ko-yue-2024-07-17 silero_vad.onnx

(py38) fangjuns-MacBook-Pro:rawfile fangjun$ ls -lh sherpa-onnx-sense-voice-zh-en-ja-ko-yue-2024-07-17/
total 493616
-rw-r--r--  1 fangjun  staff    71B Jul 18 21:06 LICENSE
-rw-r--r--  1 fangjun  staff   104B Jul 18 21:06 README.md
-rwxr-xr-x  1 fangjun  staff   5.8K Jul 18 21:06 export-onnx.py
-rw-r--r--  1 fangjun  staff   228M Jul 18 21:06 model.int8.onnx
-rw-r--r--  1 fangjun  staff   308K Jul 18 21:06 tokens.txt

(py38) fangjuns-MacBook-Pro:rawfile fangjun$ tree .
.
├── sherpa-onnx-sense-voice-zh-en-ja-ko-yue-2024-07-17
│   ├── LICENSE
│   ├── README.md
│   ├── export-onnx.py
│   ├── model.int8.onnx
│   └── tokens.txt
└── silero_vad.onnx

1 directory, 6 files
Now you should see the following inside DevEco Studio:
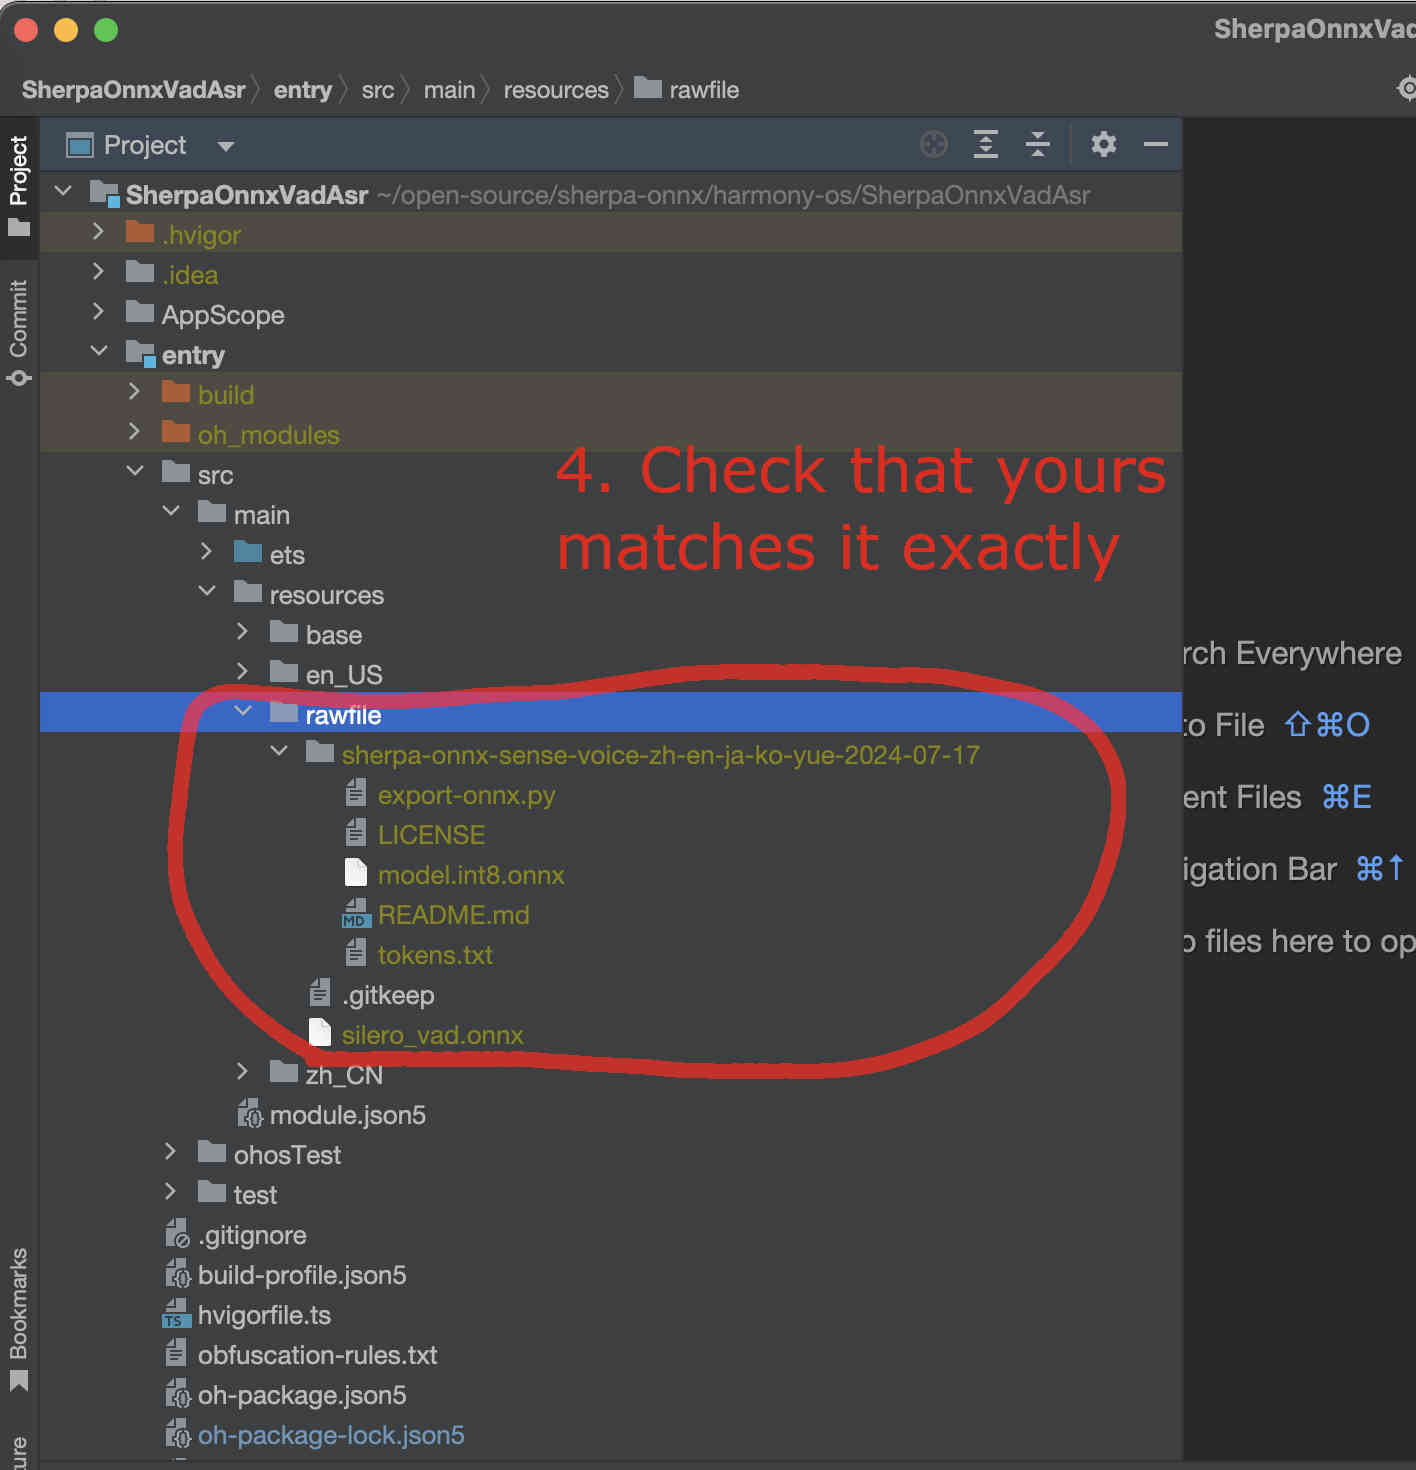
Fig. 86 Step 4: Check the model directory inside the rawfile directory.
Now it is time to modify the code to use our model.
We need to change NonStreamingAsrWithVadWorker.ets.
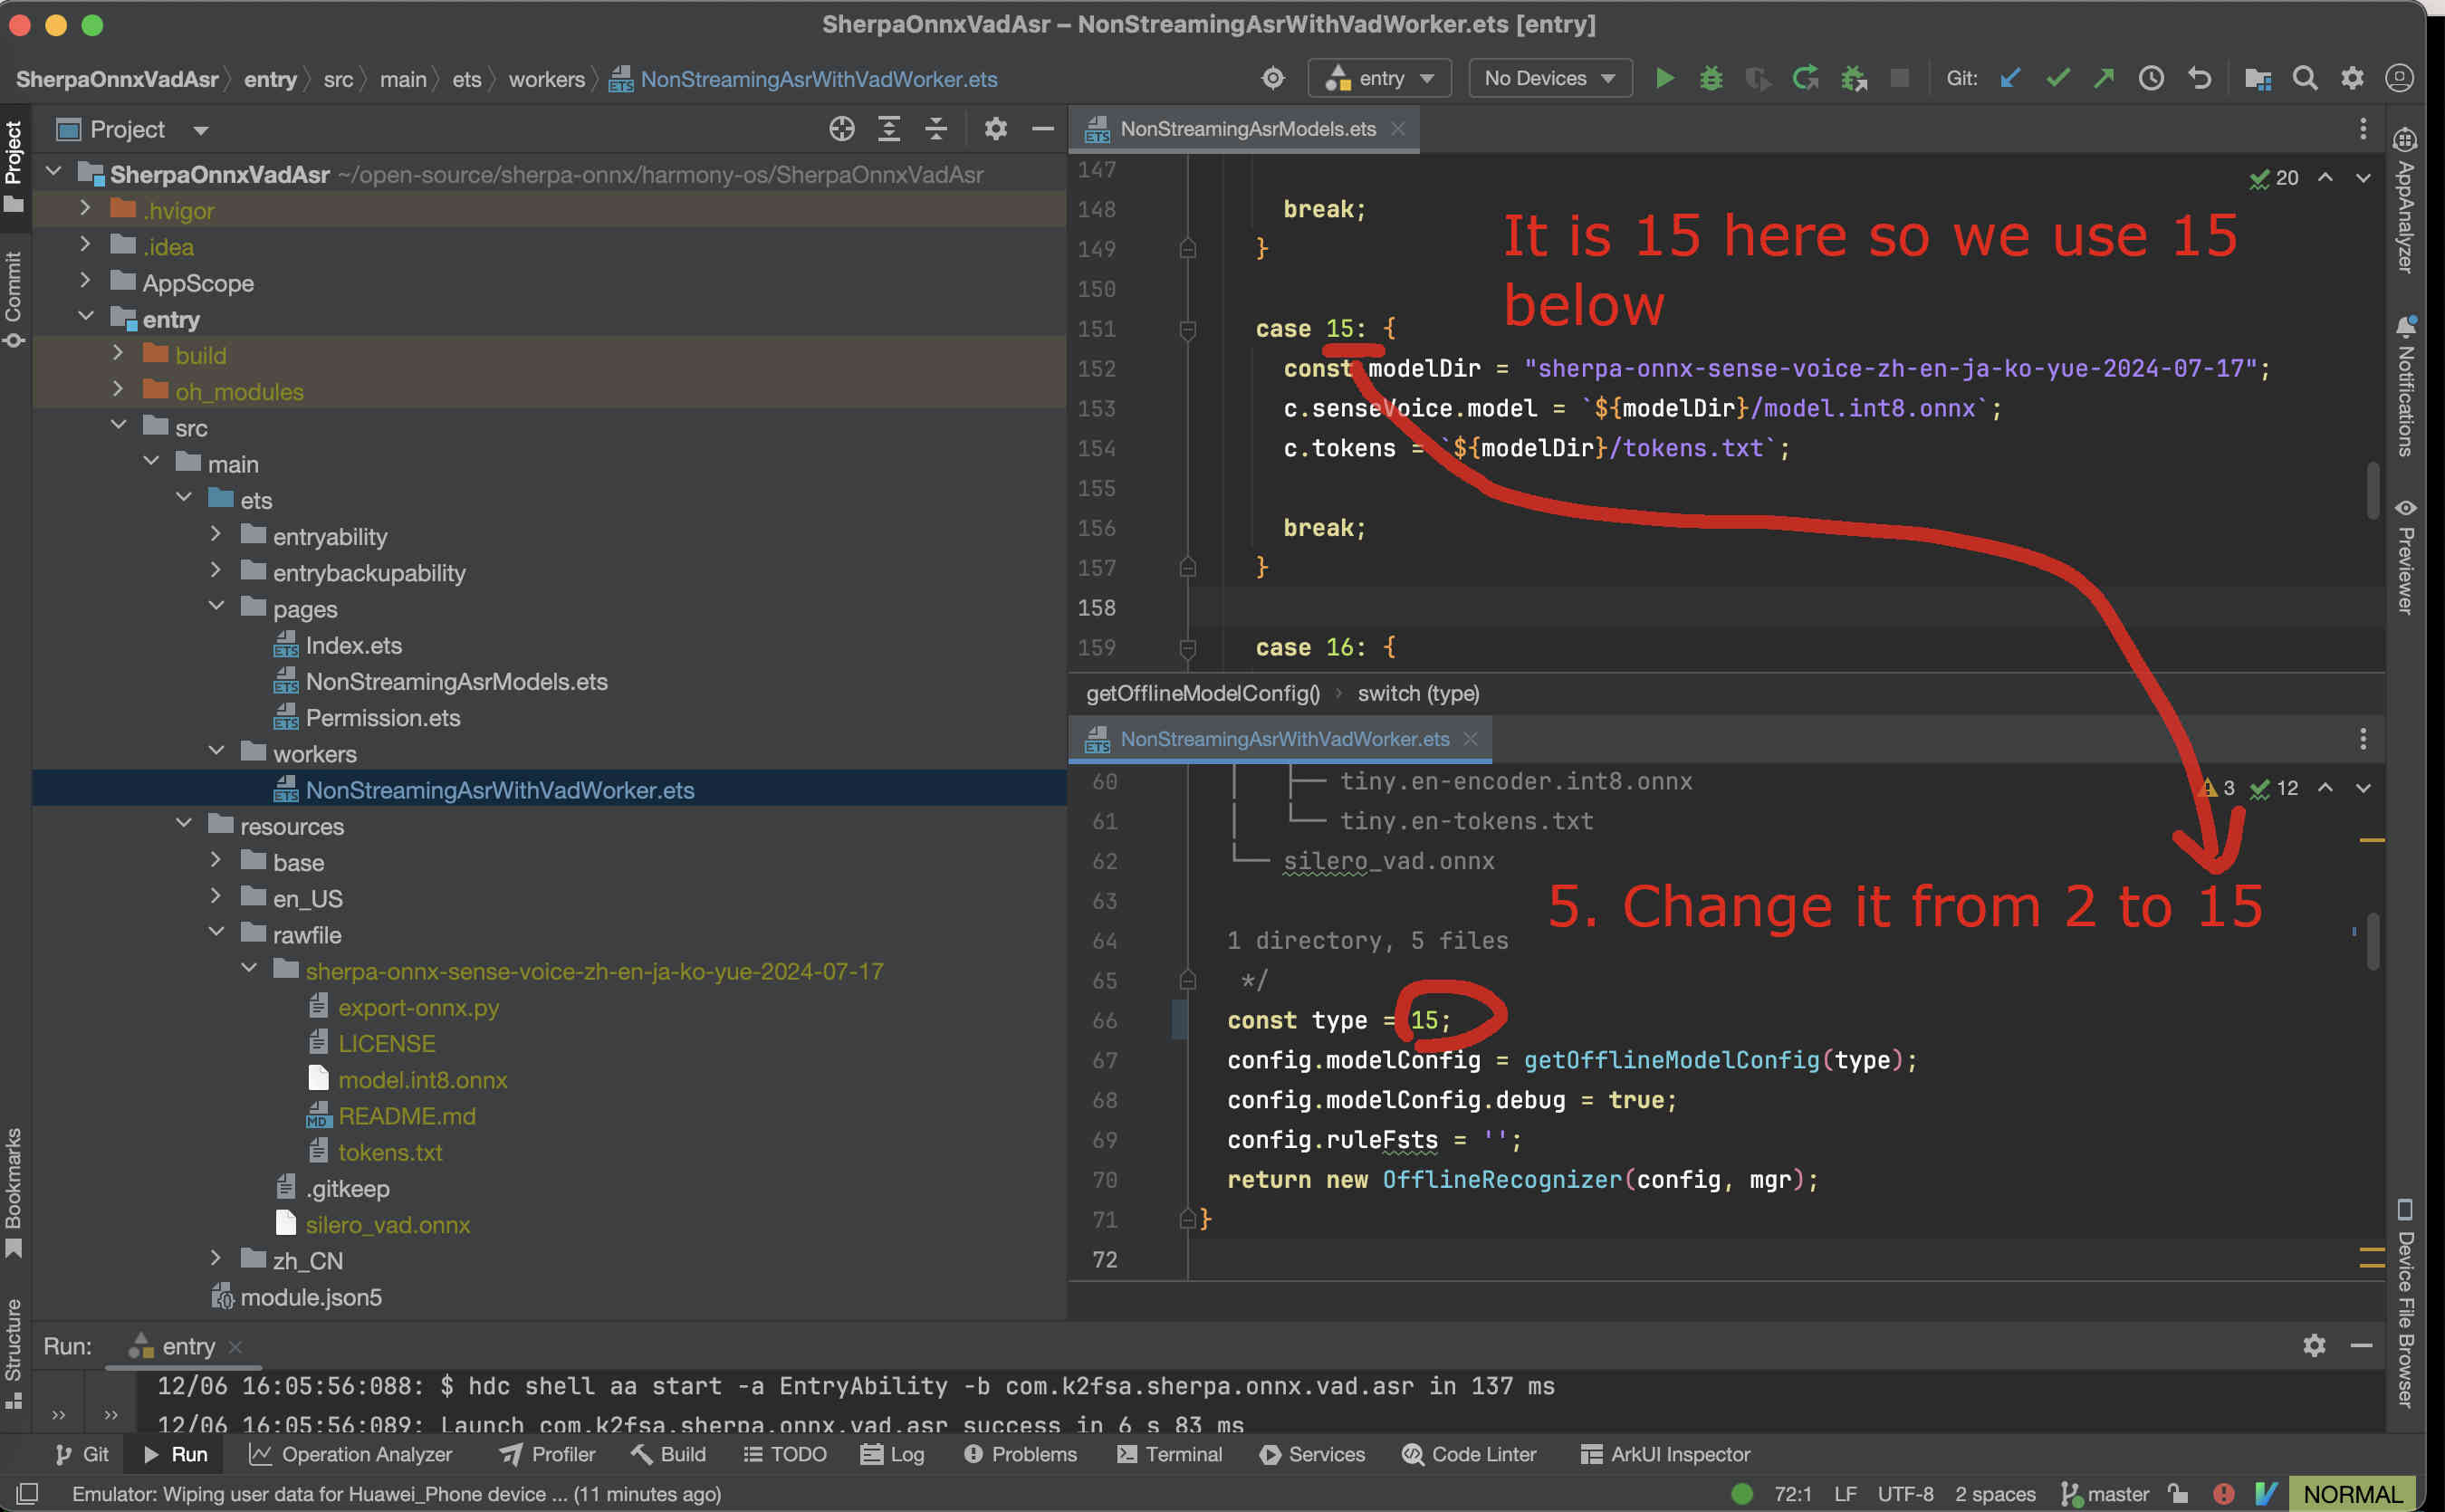
Fig. 87 Step 5-1: Change the code to use our selected model
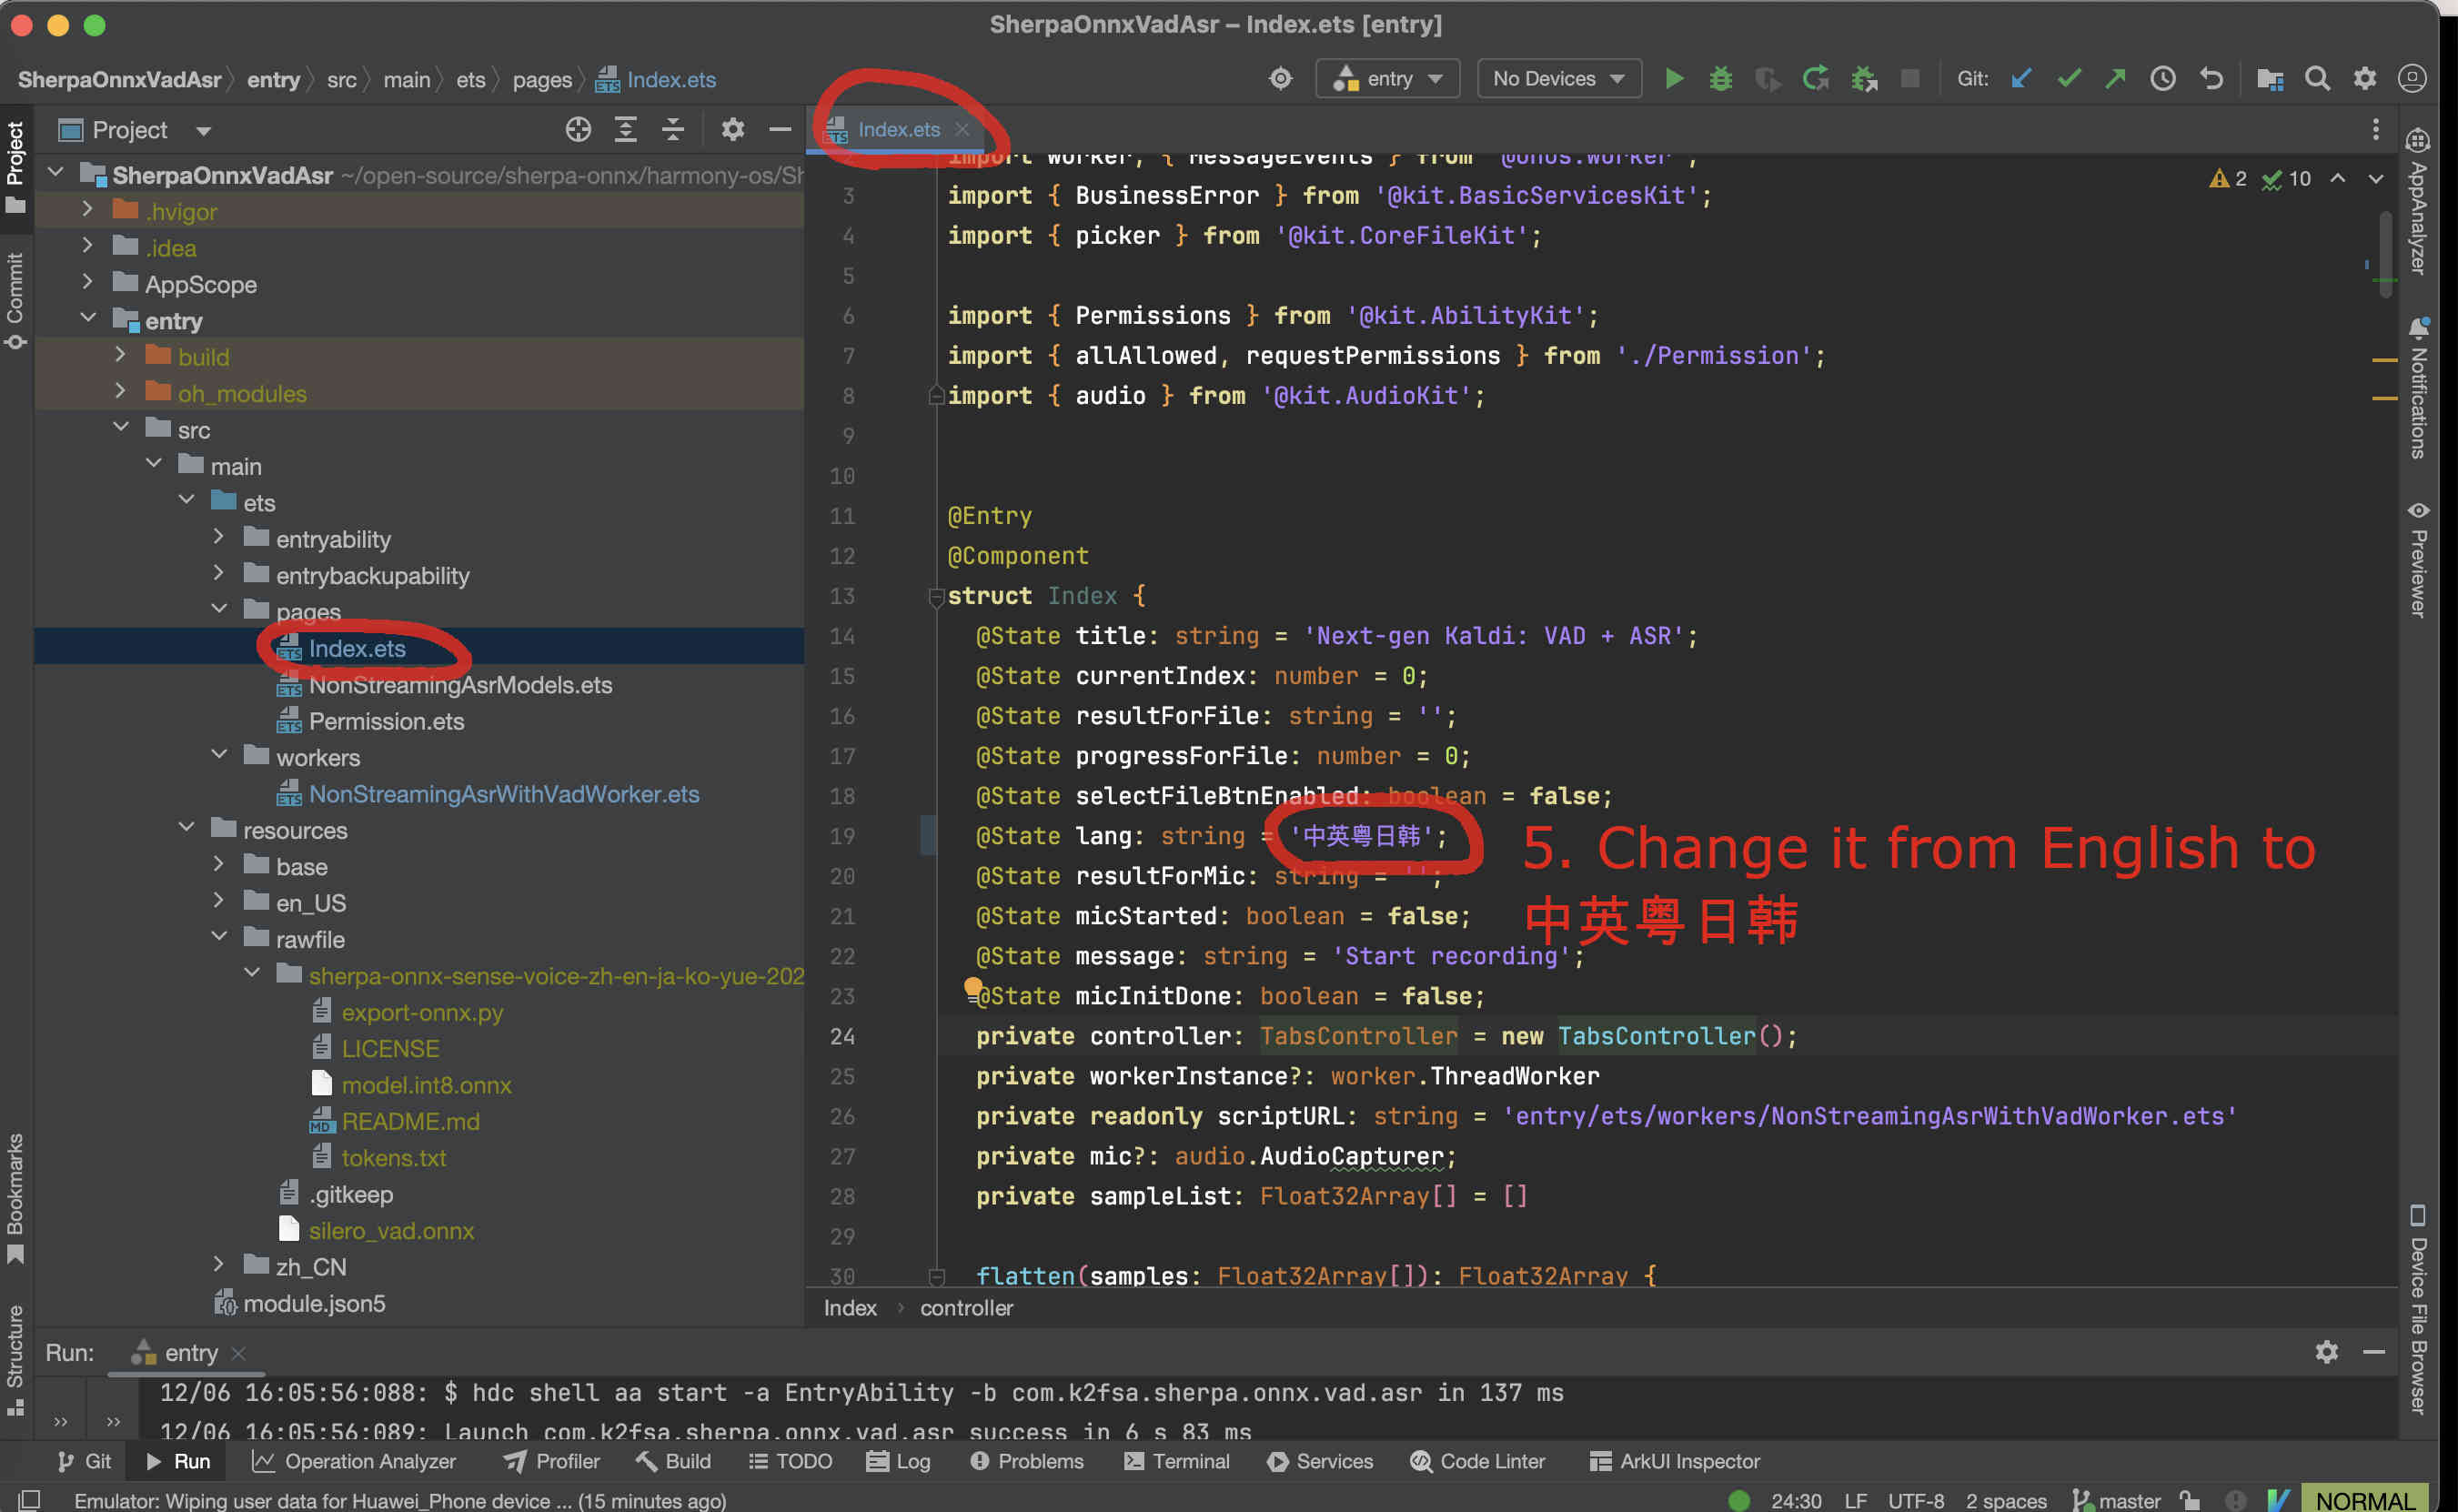
Fig. 88 Step 5-2: Change the code to use our selected model
Finally, we can build the project. See the screenshot below:
Fig. 89 Step 6: Build the project
If you have an emulator, you can now start it.
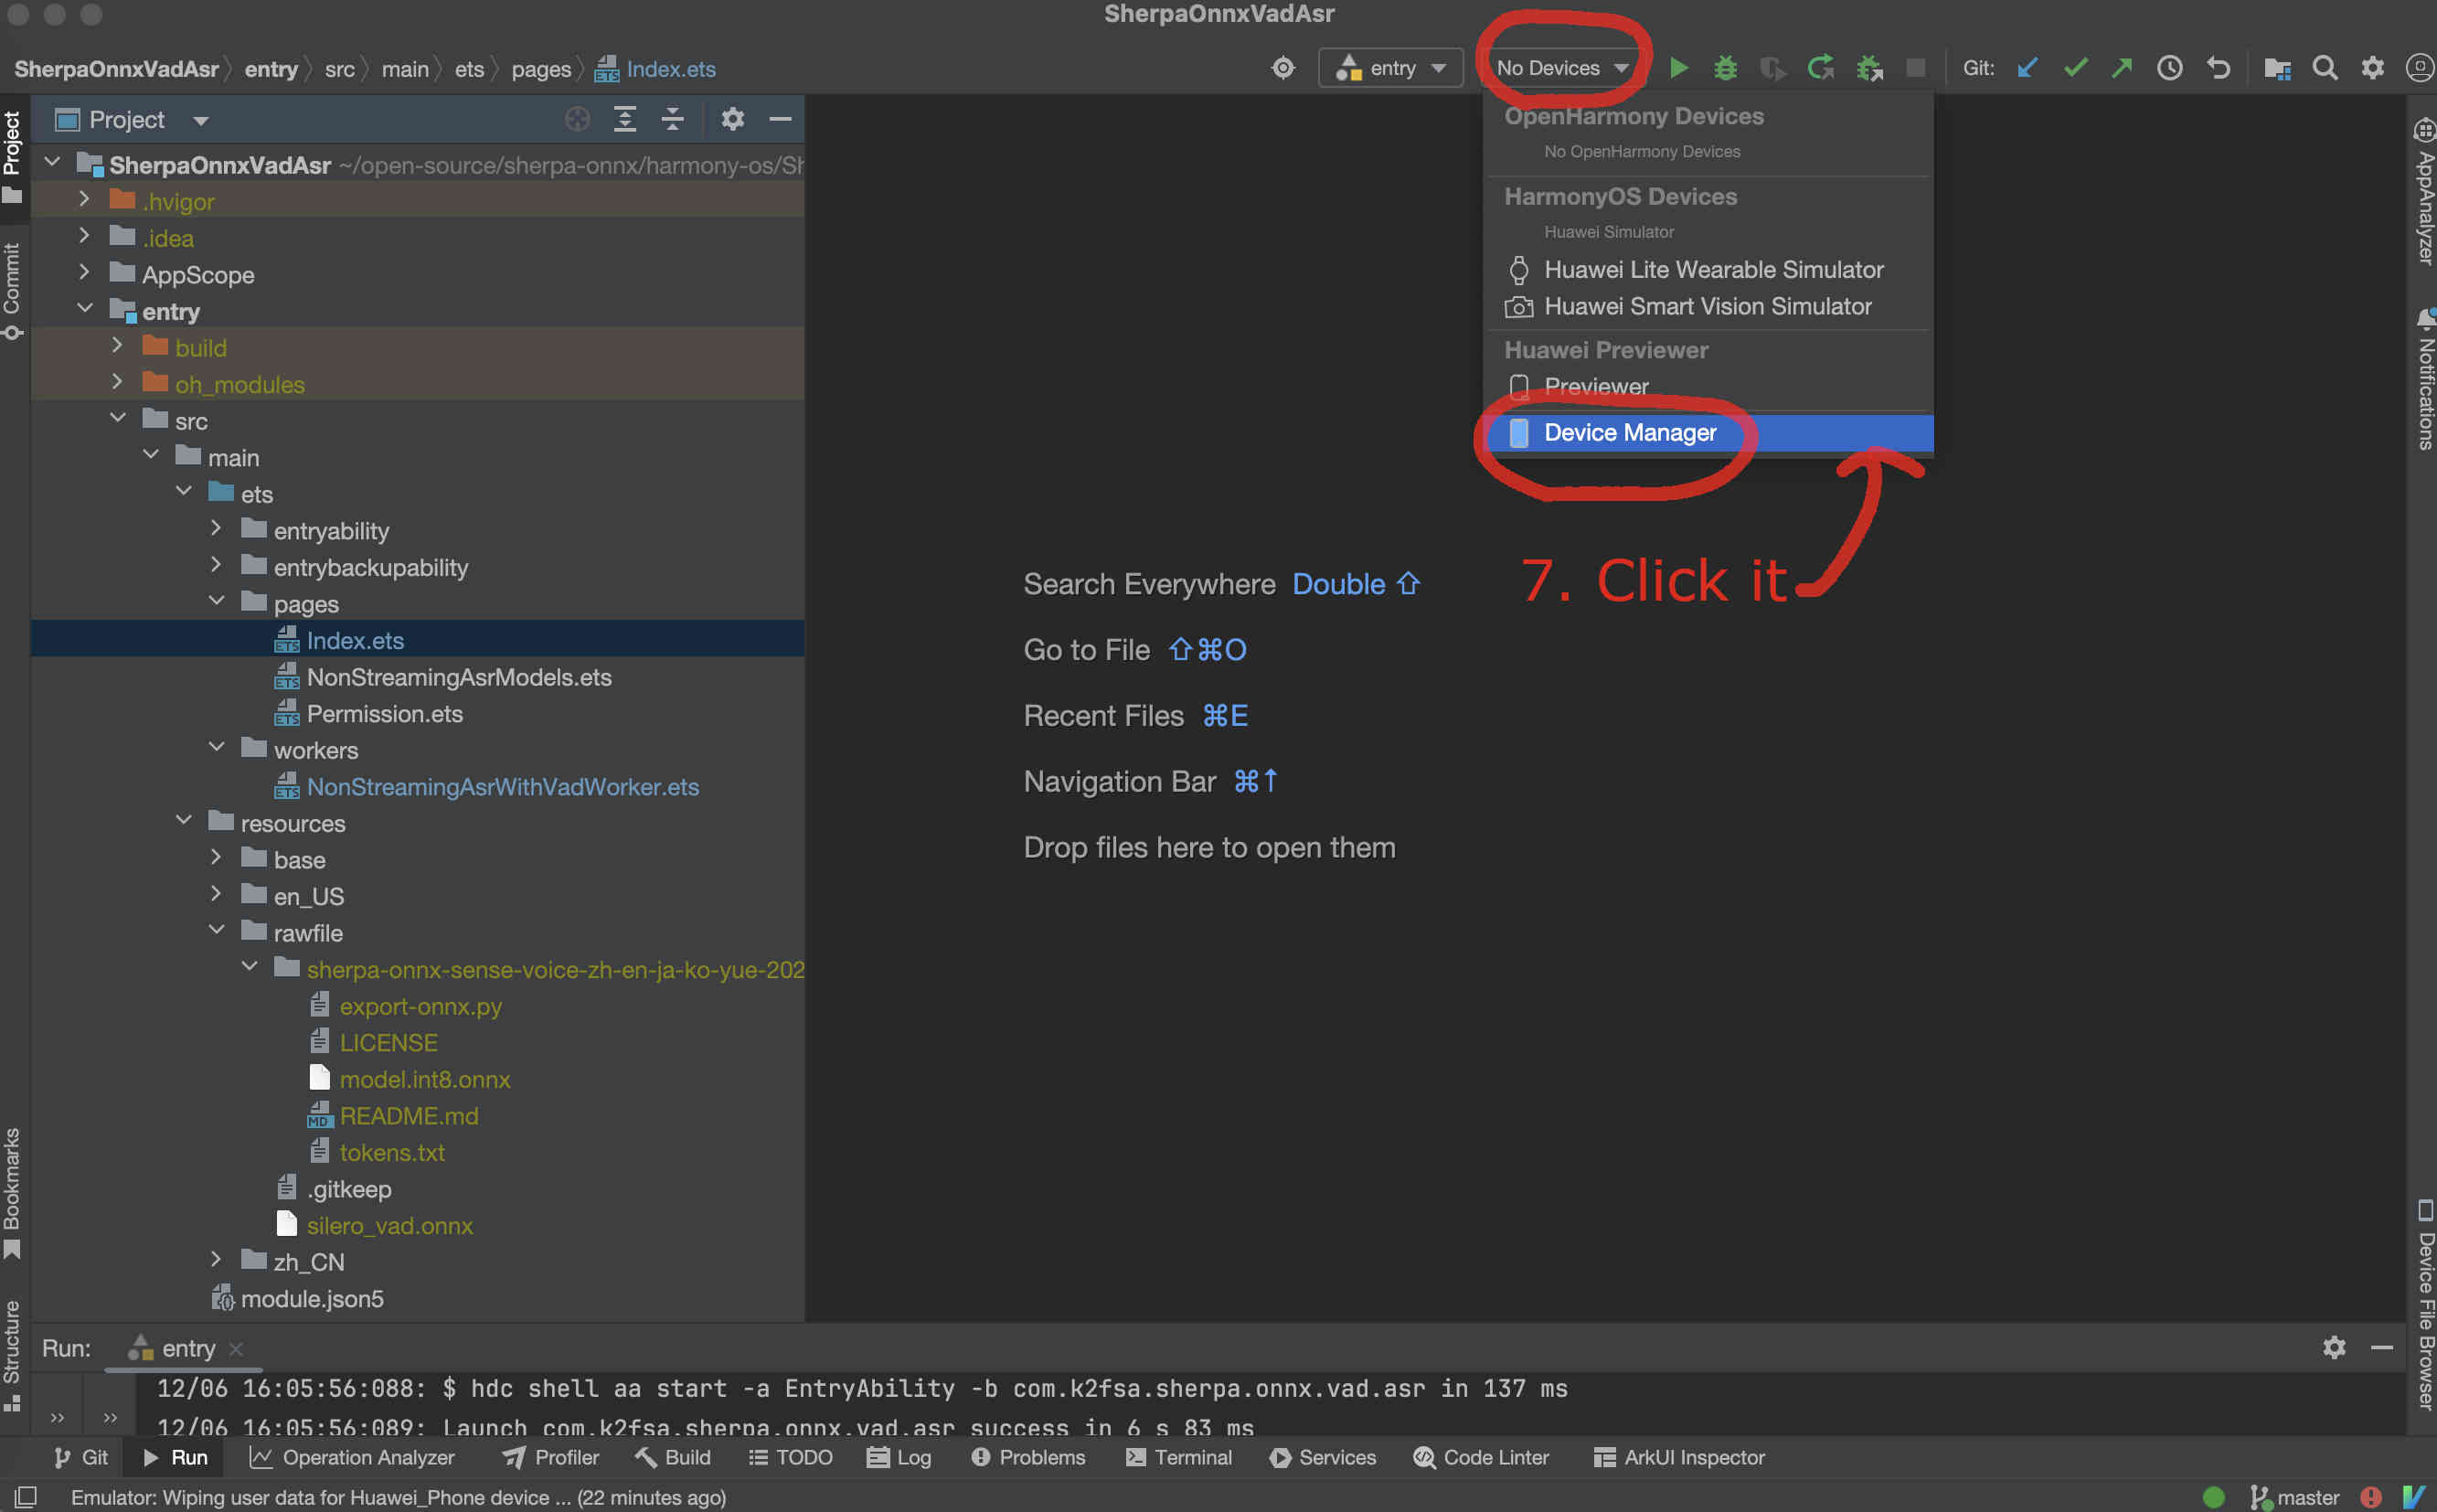
Fig. 90 Step 7: Select the device manager
Fig. 91 Step 8: Start the emulator
After the emulator is started, follow the screenshot below to run the app on the emulator:
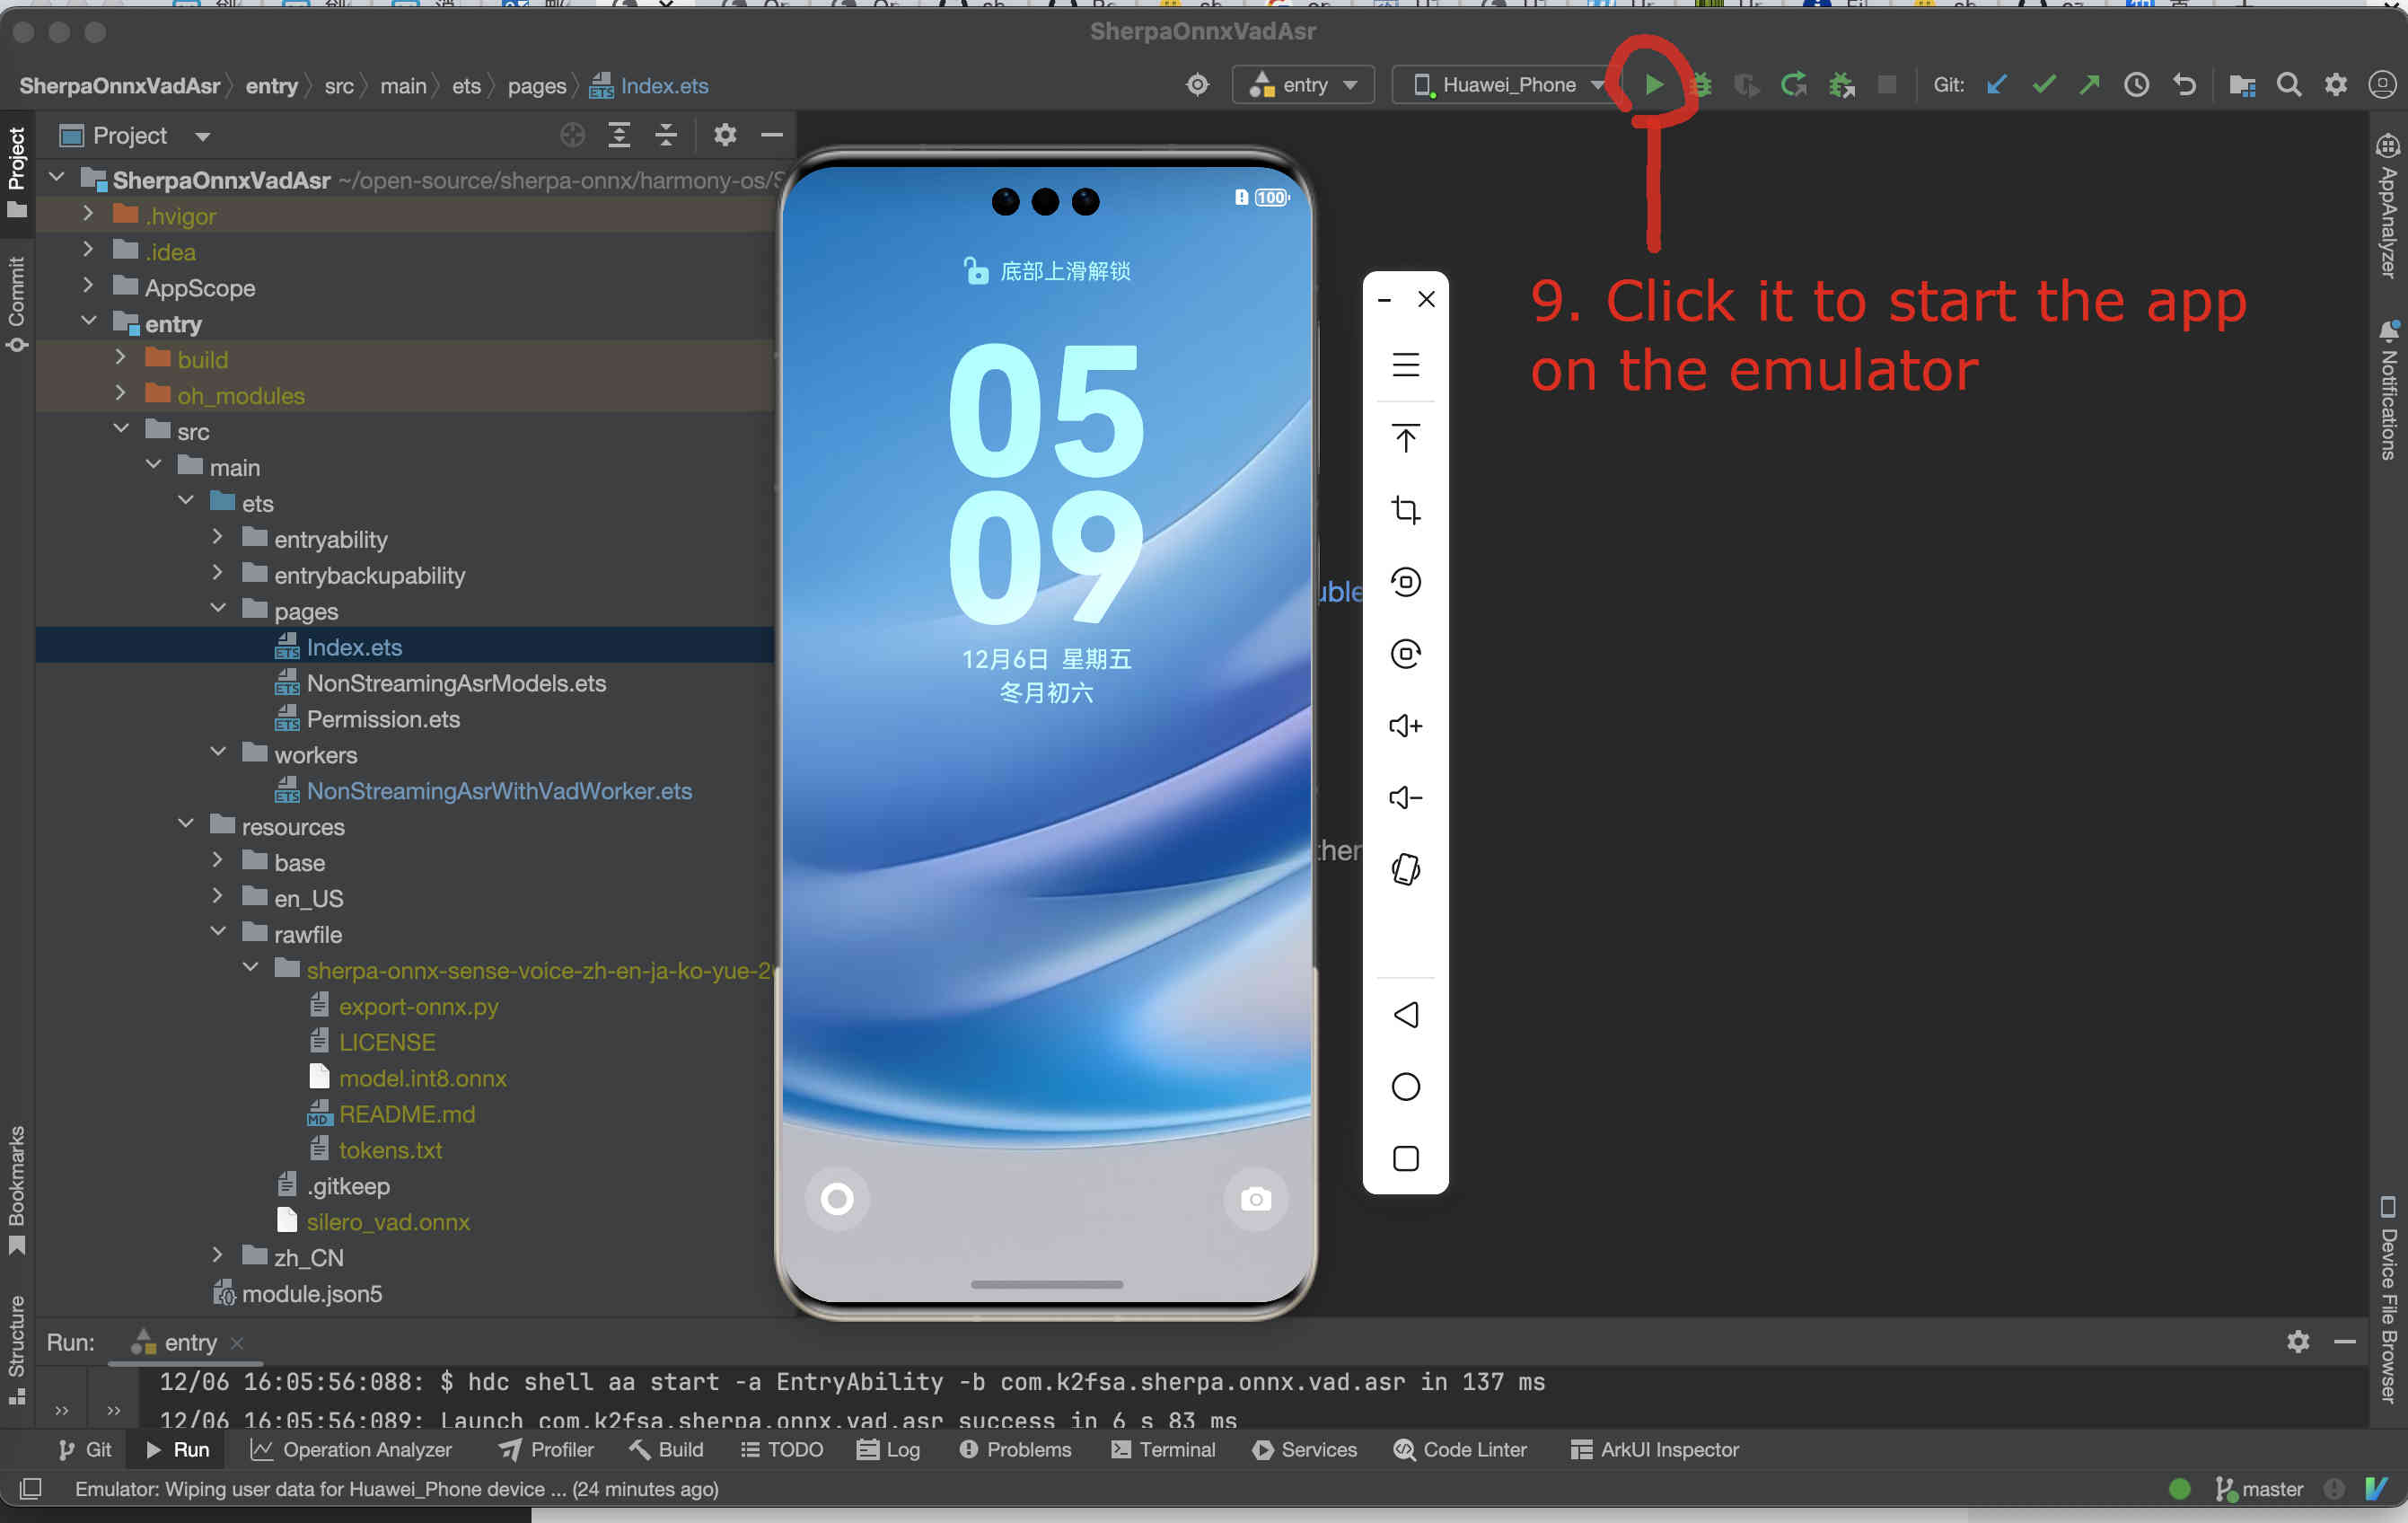
Fig. 92 Step 9: Start the app on the emulator
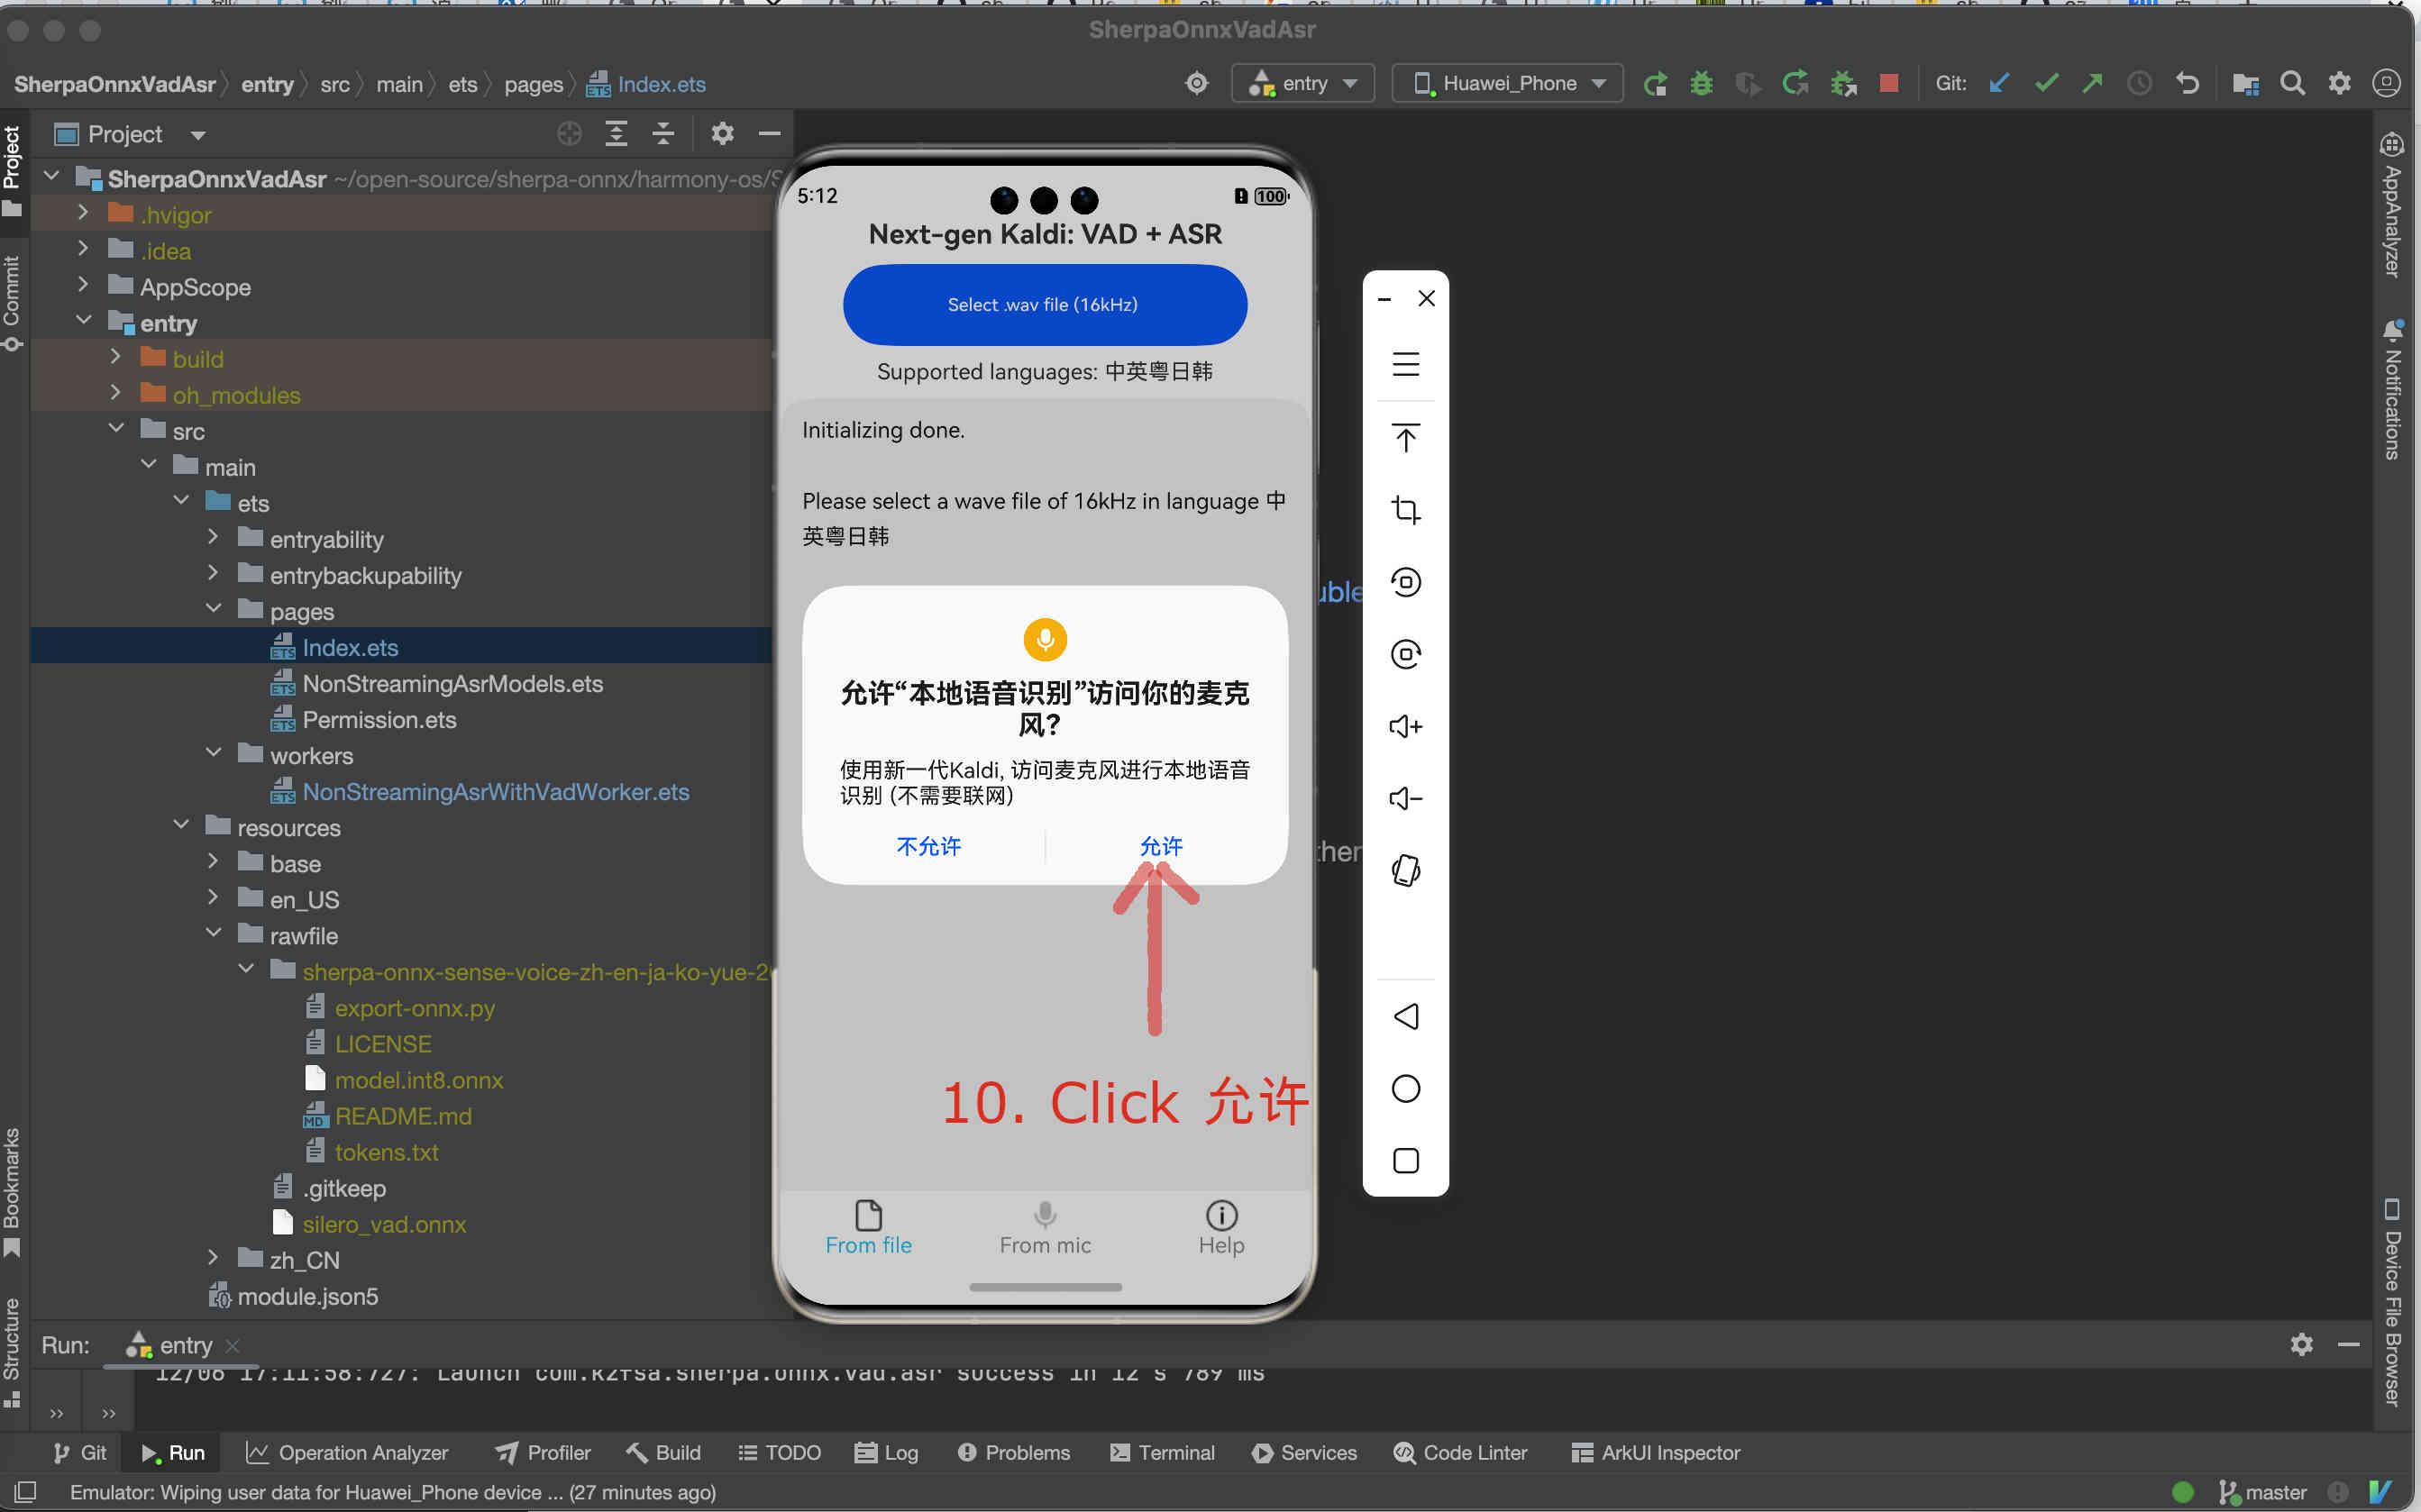
Fig. 93 Step 10: Click Allow to allow the app accessing the microphone

Fig. 94 Step 11: Select a .wav file for recognition
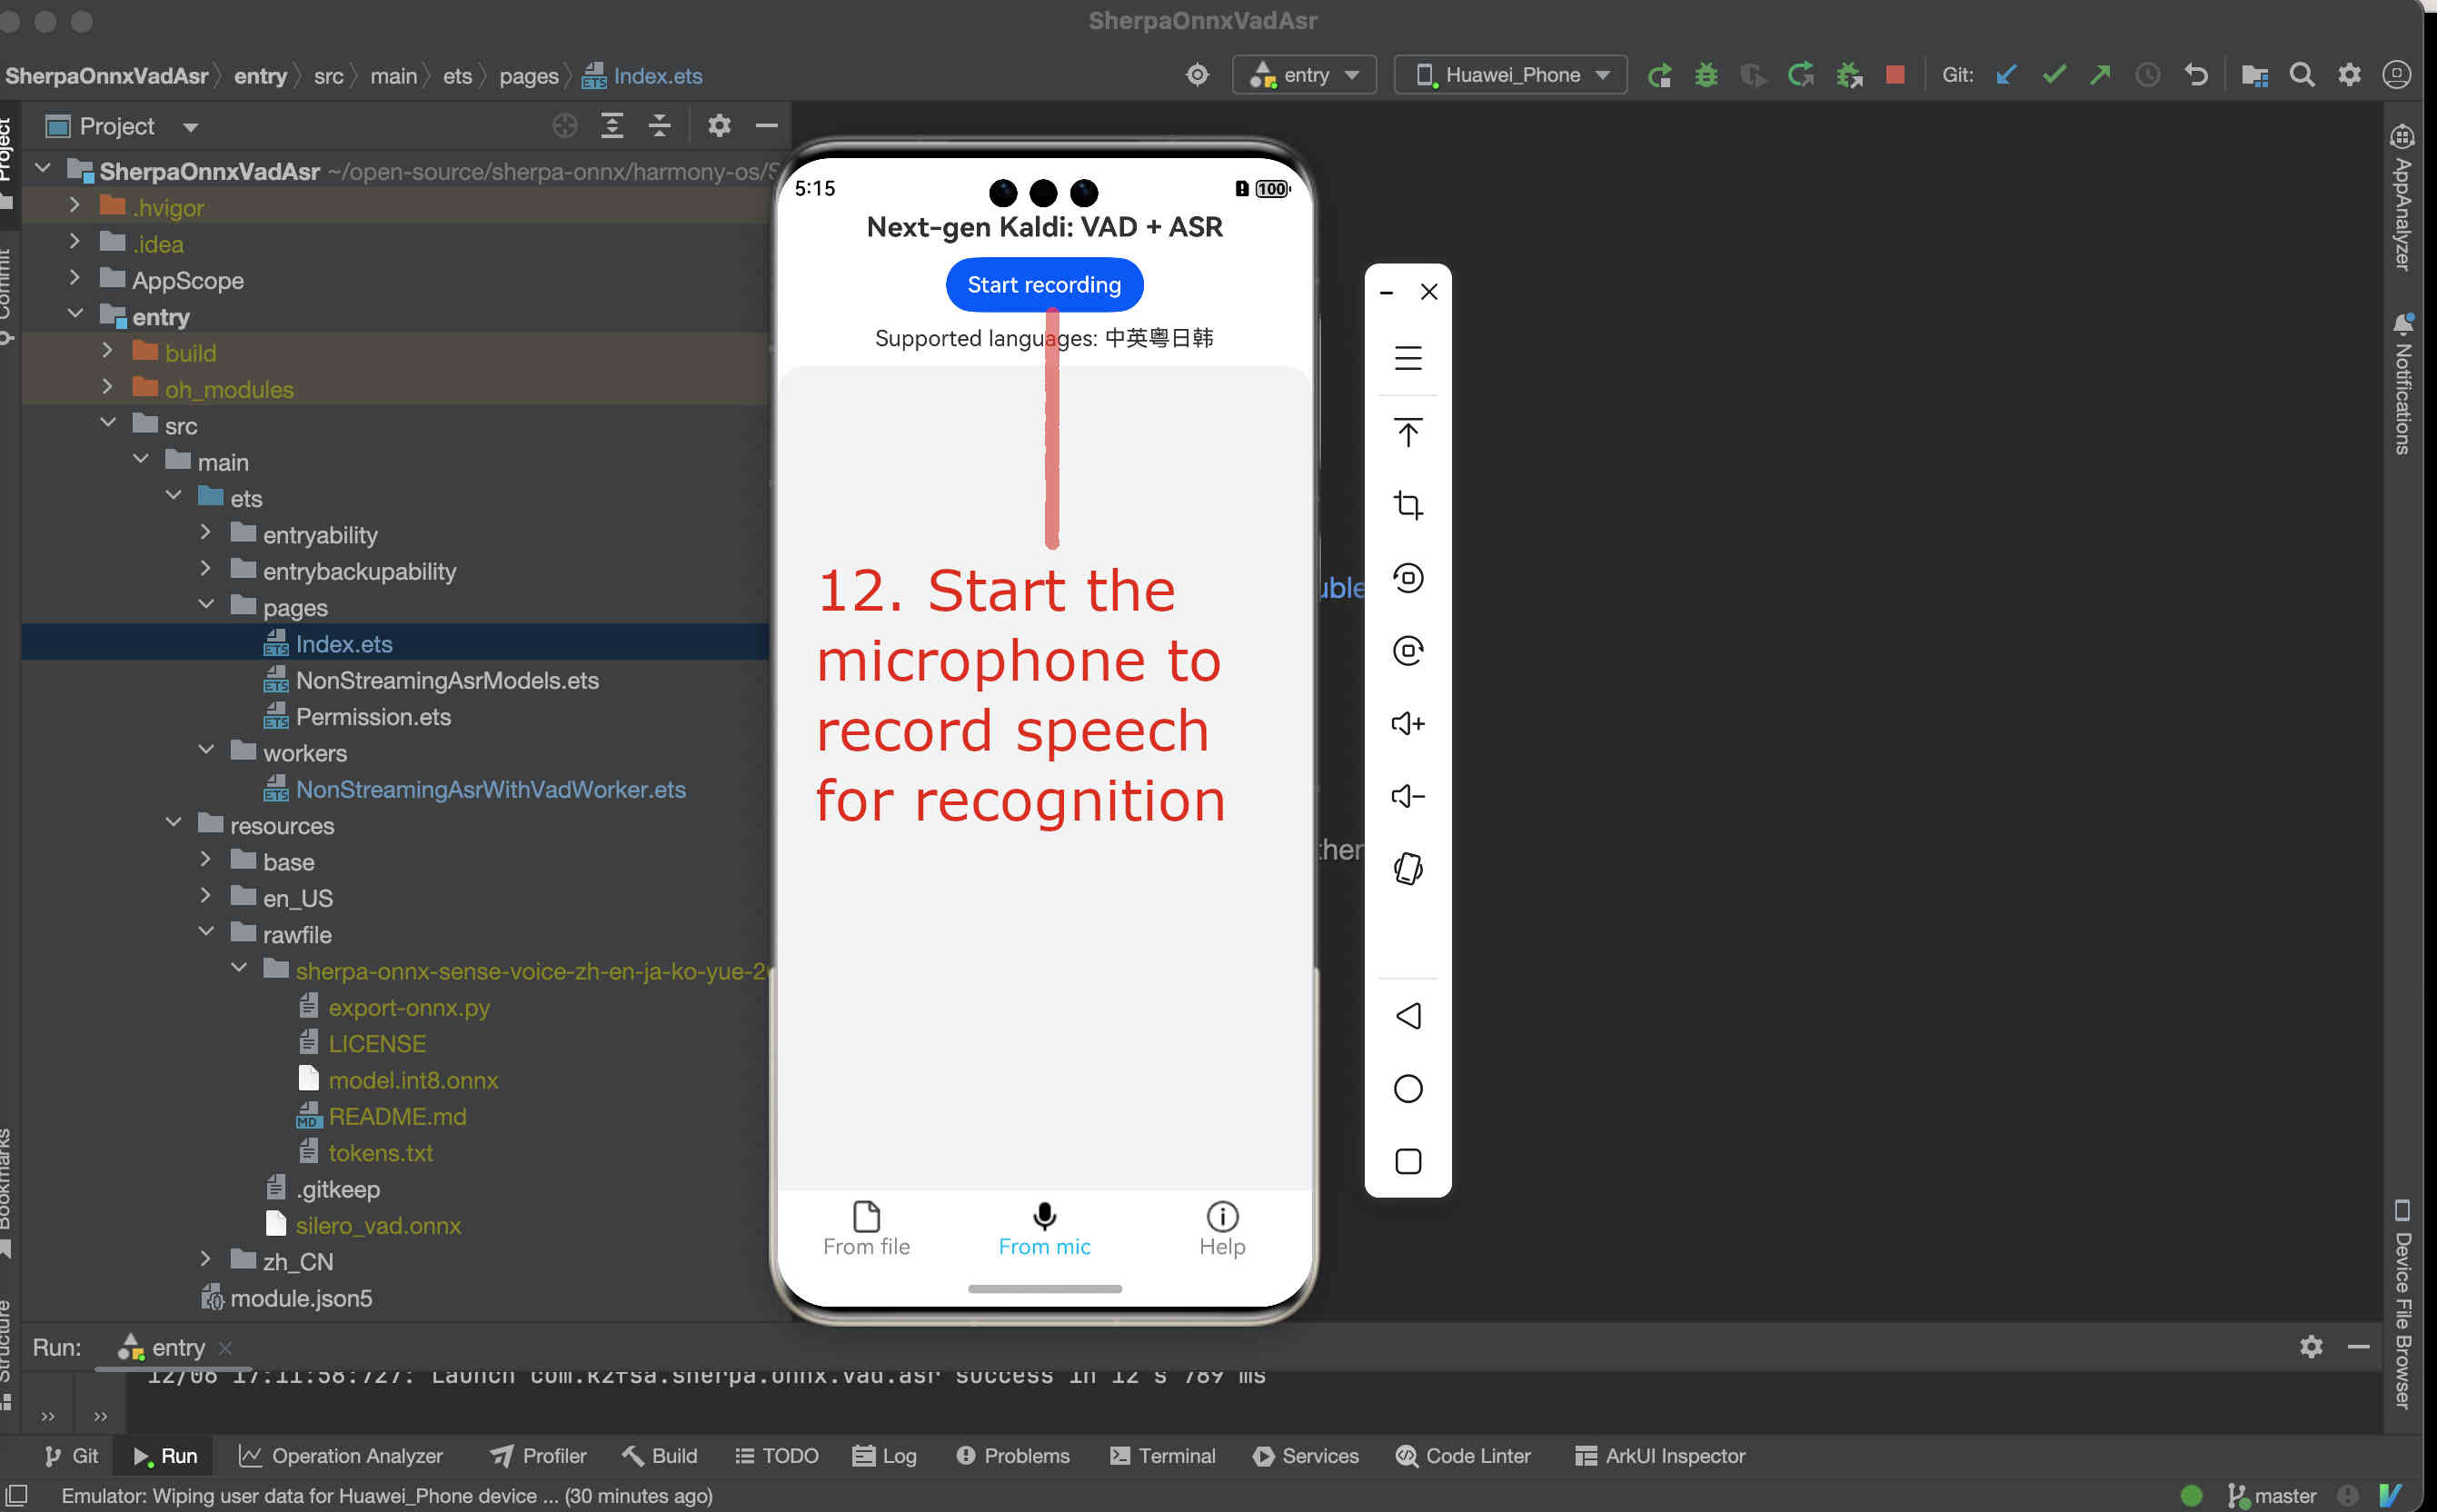
Fig. 95 Step 12: Start the microphone to record speech for recognition
Congratulations!
You have successfully run a on-device non-streaming speech recognition APP on HarmonyOS!